

Walkthrough Super Mario Run

What you'll find in this guide:
Super Mario Run World 1 walkthrough
• Super Mario Run 1-1 walkthrough
• Super Mario Run 1-1 pink coin locations
• Super Mario Run 1-2 walkthrough
• Super Mario Run 1-2 pink coin locations
• Super Mario Run 1-3 walkthrough
• Super Mario Run 1-3 pink coin locations
• Super Mario Run 1-4 walkthrough
• Super Mario Run 1-4 pink coin locations
• Super Mario Run tips and tricks
Super Mario Run World 2 walkthrough
• Super Mario Run 2-1 pink coin locations
• Super Mario Run 2-2 walkthrough
• Super Mario Run 2-2 pink coin locations
• Super Mario Run 2-3 walkthrough
• Super Mario Run 2-3 pink coin locations
• Super Mario Run 2-4 walkthrough
• Super Mario Run 2-4 pink coin locations
• Super Mario Run tips and tricks
Super Mario Run World 3 walkthrough
• Super Mario Run 3-1 walkthrough
• Super Mario Run 3-1 pink coin locations
• Super Mario Run 3-2 walkthrough
• Super Mario Run 3-2 pink coin locations
• Super Mario Run 3-3 walkthrough
• Super Mario Run 3-3 pink coin locations
• Super Mario Run 3-4 walkthrough
• Super Mario Run 3-4 pink coin locations
• Super Mario Run tips and tricks
Super Mario Run World 4 walkthrough
• Super Mario Run 4-1 walkthrough
• Super Mario Run 4-1 pink coin locations
• Super Mario Run 4-2 walkthrough
• Super Mario Run 4-2 pink coin locations
• Super Mario Run 4-3 walkthrough
• Super Mario Run 4-3 pink coin locations
• Super Mario Run 4-4 walkthrough
• Super Mario Run 4-4 pink coin locations
• Super Mario Run tips and tricks
Super Mario Run World 5 walkthrough
• Super Mario Run 5-1 walkthrough
• Super Mario Run 5-1 pink coin locations
• Super Mario Run 5-2 walkthrough
• Super Mario Run 5-2 pink coin locations
• Super Mario Run 5-3 walkthrough
• Super Mario Run 5-3 pink coin locations
• Super Mario Run 5-4 walkthrough
• Super Mario Run 5-4 pink coin locations
• Super Mario Run tips and tricks
What you'll find in this guide:
• Super Mario Run 1-1 walkthrough
• Super Mario Run 1-1 pink coin locations
• Super Mario Run 1-2 walkthrough
• Super Mario Run 1-2 pink coin locations
• Super Mario Run 1-3 walkthrough
• Super Mario Run 1-3 pink coin locations
• Super Mario Run 1-4 walkthrough
• Super Mario Run 1-4 pink coin locations
• Super Mario Run tips and tricks
If you tend to get a little frustrated with 2-D sidescrollers but still can't resist them, Super Mario Run is going to be equal parts exciting and frustrating. And the game's extra challenge of tracking down pink coins hidden in each level will only make things more difficult.
Fortunately, we've compiled a handy list of tips and tricks to help get you through the Super Mario Run's deceptively simple levels, and we've also compiled where and how to get the pink coins in each level. So let's get running and start with the first of the game's six worlds!
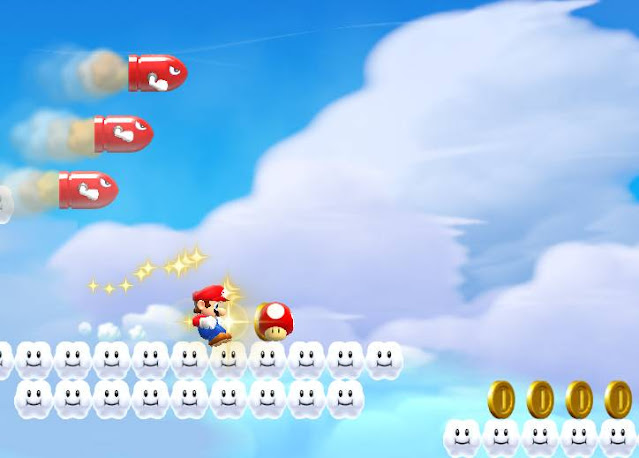
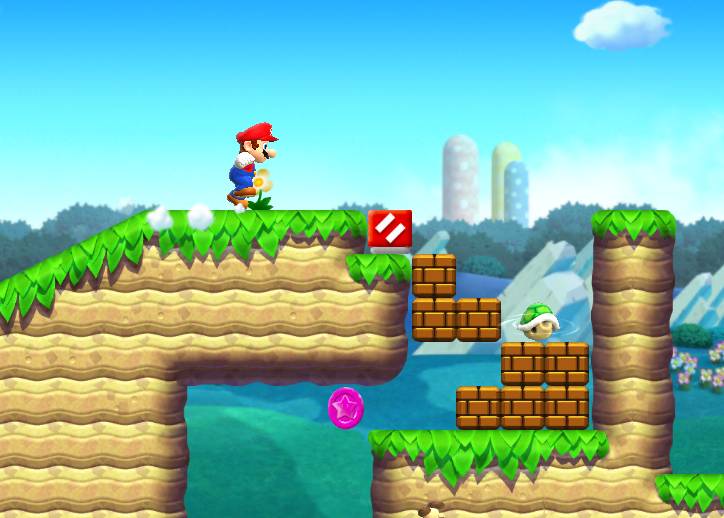
Super Mario Run 1-1 walkthrough: "Up and Over"
The first level of Super Mario Run is pretty tame, given that it's the first level outside the tutorial you'll be doing, but there are still a few tricks to help you out. If you can hit either one of the two question blocks at the very beginning you'll get a super mushroom. If you're lucky enough to hit both blocks, you can collect both items and get a 5-coin bonus for the second one. It's tricky, but you can pull it off with good timing.

Hitting either of these blocks at the beginning of 1-1 will give you a super mushroom, allowing Mario to take an extra hit.
Your first real challenge comes a little bit after when you reach a depression with a Goomba and a pink coin in it. If you jump to hit the pink coin, you'll have to remember to press and hold the screen to jump higher when you hit the Goomba at the bottom. That should be enough to clear the pipe in front of you and keep running forward without wasting any time.

If you tap your screen while Mario is vaulting over an enemy (which he does automatically as you run past them) you can use them to jump, but unless you hold down after you tap the screen, Mario won't make it over the pipe.
The only other real problem you're likely to run into during this introductory level comes about halfway through when you reach a small pit with some question block platforms on one side and a small wall on the other. If you mess up your jump while on the platform, chances are you won't clear the wall and Mario will begin sliding down the side of it. Tapping jump when this happens will cause Mario to jump off the side of the wall, launching him back onto the other side of the pit. It's disorienting and can cause some tapped panic jumps that could see you falling into the pit if you're not careful.

If you don't clear the wall on the far end of this pit, an ill-timed jump could send you flying back to the opposite side, costing you valuable time.
Other than that, it should be smooth sailing to the end of the level: Simply follow the trails of coins and you'll be there in no time. Just watch out if you're jumping from a lower level to a higher one. If Mario makes contact with an enemy from below, he'll take damage, and without a super mushroom to absorb the hit you could be starting the stage over again.
Super Mario Run 1-1 pink coin locations
As "Up and Over" is the first level, the coins aren't too hard to grab even if you're going through the level for the first time.
The first pink coin is hard to miss since there's a big line of coins leading to it. Simply jump to grab it, or hop on the Goomba if you're feeling especially stylish.

It'll be pretty hard to miss the first coin in Up and Over since it's directly in your path: a common theme for this level.
The second coin is floating above a small ledge formed by three question blocks. If you get up onto those three blocks, it should be very easy from there to jump off and grab the coin.

You'll have to be on the middle platform in order to reach this second coin effectively.
The third coin is on top of some platforms, and it shouldn't be hard to get up to the required height by the time the coin shows up.

Thankfully it's not hard to jump up on these platforms to get the third coin.
While navigating some short pipes, you'll see the fourth coin above you on a ledge. With a well-timed jump, you should be able to grab it without issue.

The fourth coin is also decidedly hard to miss, but rest assured, they'll get more difficult as the game progresses.
The final coin is right before the home stretch of the level. It's on top of another platform with four Goombas on it. With some fast hopping, you can get all the Goombas and leap to the coin, but the Goombas might mess up your flow, causing you to miss.

Although not a particularly tricky jump, vaulting off the last Goomba here can cause you to sail right past the final pink coin.
Super Mario Run 1-2 Walkthrough: "Wall-Kicking It Underground"
As the name of this level implies, it's another introductory level designed to get you comfortable with a new mechanic: the wall jump. Much like level 1-2 in the original Super Mario game, it's underground. That means you won't have to worry much about in terms of falling into pits, but the pipes in this level are full of Piranha Plants so be careful.

Don't be fooled by the lack of pits in 1-2: these pipes contain Piranha Plants, so you'll need to be quick on the jump button to avoid ending up as a Piranha Plant snack.
That said, the level is pretty straightforward. Try to stay on the top portions of the level since that's where most of the coins are. Other than that, as long as you keep watch for the Piranha Plants, you aren't likely to run into much trouble, until the tail end of the level, where you're forced to wall jump up a crevasse with two pipes on it. You'll have to time your jumps just right so you don't slide off the wall, but also so you don't get chomped by the two plants that periodically emerge to ruin your day.

You have to be careful in where and when you jump in order to make it to the top of this area, since the Piranha Plants will damage you if you touch them.
Once that's dealt with, you have a short section above ground with two Goombas, and then you're home free.
Super Mario Run 1-2 pink coin locations
The pink coins in "Wall-Kicking It Underground" will require you to take the high road in several situations.
The first coin is in the starting area. After you've made the initial wall jump up to an area where two Goombas are walking toward you, you should see another wall you can wall jump up. Doing that successfully will land you on top of a ledge. On the far side of that ledge past a Piranha Plant is the first pink coin.

With a little bit of wall jumping practice, it should be no trouble to grab the first coin.
The second coin is tricky to get to. A little after the first coin, you'll reach another wall jumping area which requires you to get about halfway up it in order to advance. However, if you opt to slide down a little on the ledge before jumping off it, you can make it further up the side of the opposite, wall, allowing you to reach a small ledge where you can get up to the second coin.

You could probably make it to this coin with some frenetic wall jumps, but it's better to time your jumps so that you can reach the other side of the wall.
About halfway through the level, you'll reach a hill that Mario slides down, knocking a bunch of hapless Goombas out of the way. You can ride it all the way to the bottom, or you can jump off at about the midway point (indicated by an arrow) and launch yourself onto yet another ledge you'll find the third pink coin.

By interrupting Mario's leisurely slide down the hill in the level's midpoint with a jump, you can launch him onto this platform where the third coin is.
The fourth coin comes at the bottom of another hill you can slide down. If you jump off while sliding in time to collide with the wall opposite it, you can wall jump to the top of it and find the penultimate coin.

Another mid-slide jump at the tail end of the level will let you land on this precarious platform where the fourth coin is.
The final coin is the easiest spotted, but the trickiest to get. It's in a patch of coins that's visible from the ground, but you'll have to time your wall jumps to avoid two Piranha Plants in order to get it.

It's going to take some nerves of steel (or at least good timing) in order to get the final pink coin without getting chomped by the Piranha Plant.
Super Mario Run 1-3 walkthrough: "Paratroopas in Mushroom Valley"
By this point, hopefully, you've been honing your skills in jumping and hitting enemies, because you're going to need to be able to do both in order to survive Paratroopas in Mushroom Valley.
Right as the level starts, a super mushroom sits on a platform a little higher than Mario. If you can hit the Paratroopa (the flying Koopa) or one of the Goombas just right, you'll propel yourself up to the super mushroom and have a good advantage for the rest of the level, but if you mess up the timing, you might collide directly with the Paratroopa and be out one of your bubbles before the level even starts.

If you're susceptible to panic jumping, chances are more than a few of your runs on this level will end right here once you collide with the Paratroopa.
Other than the constant threat of Mario plummeting to his death from the tops of the mushrooms you're running on, this level is pretty straight forward. If you keep to the lower levels, you'll find a red coin ring: collect all five and you'll get a Super Star, which will grant you temporary invincibility and a coin magnet, making it easier to grab those pesky pink coins.

Depending on your reaction time, the Red Coin Ring in 1-3 can either be an easy way to get some extra coins, or a constant source of frustration.
"Paratroopas in Mushroom Valley" also introduces a new type of block with an arrow pointing to the right. If you hit jump while Mario is on these blocks, he'll leap forward, which, depending on your luck and timing, can either net you a ton of coins or launch you into harm's way.

The leap blocks are great for propelling Mario through rings of coins, but haphazard timing will cause him to fall off the stage very quickly.
Once you've navigated 1-3's various pratfalls and plunges, you'll be nearing the end of the first world (and the end of your free levels, if you opted not to pay the $9.99 for the full game). Beyond lies Bowser's first castle.
Super Mario Run 1-3 pink coin locations
The pink coins in "Paratroopas in Mushroom Valley" can be easy to miss because of the amount of time you spend flying through the level using the launch blocks, but with a little practice, they're still all out in the open.
Right as the level starts, you can utilize a launch block on an upper-level mushroom that will propel you through a big bunch of coins, one of which is the first pink coin.

Make sure you hold down jump for long enough when launching yourself, or you might sail under the pink coin and miss it entirely.
The second coin requires you to use a Paratroopa to launch yourself up to a higher mushroom. It's best to try to bounce off the Paratroopa right as you see him, but you can rest on a conveniently placed pause block and wait for him to come back if you miss your first chance.

The second coin requires a well-timed bounce off a Paratroopa in order to get up to this ledge where it resides.
The third coin is also guarded by a Paratroopa, but it's a slightly easier jump. Even if you bungle the timing, you might still be able to get it when you land on the platform below it.

Another Paratroopa to bounce off, another pink coin. Even if you miss it on the initial bounce, you might still be able to grab it when you land on the platform.
The fourth coin is underneath a big mushroom platform in the back half of the level. It can be kind of tricky to get without hitting the Goombas on the platform above. Other than that, it's just a quick jump and grab.

You'll have to thread the needle between the Paratroopa and the Goombas in order to get this coin, since hitting the Paratroopa will likely cause you to collide with the other.
The final coin requires you to ignore the launch blocks immediately before it, instead simply rolling off to collect the coin. It's going to be tough to kick the habit of jumping constantly, but doing nothing is technically easier.

Although it would be much more fun to jump, resist the urge and simply roll down to the platform where the final Pink Coin is.
Super Mario Run 1-4 walkthrough: "Bowser's Castle Hangout"
It really wouldn't be a Mario game if each world didn't end with our intrepid plumber storming Bowser's lava-filled castle to rescue his princess. Since Mario can't stop moving in Super Mario Run, you can expect to have to do a little more work in order to avoid from running head-first into fireballs. Fortunately, the game gives you several new types of blocks to make sure you can make it to Bowser unscathed.
The level starts under an alcove where a super mushroom is hiding. If you press jump while on the blocks along the floor with a left-pointing arrow, Mario will do a backflip to the left, and if you've timed it correctly, you'll land on the top of the alcove and collect the super mushroom, which will be indispensable for the rest of the level.

By hitting jump while running across these blocks, Mario will backflip and land on the nearest ledge, which in this case allows him to collect an early super mushroom. Alex Borkowski/Mic
While running along the top of the level, you'll also notice blocks on the ceiling with rungs on them. If you jump at these, Mario will pull himself along like he's climbing monkey bars. Not only will that help you avoid enemies, but it's also necessary for grabbing some of the pink coins.

By using the monkey bar blocks, Mario can avoid most of the traps and pitfalls of 1-4, but at some point, he'll have to come down and deal with the lava and fireballs along the floor. Alex Borkowski/Mic
Eventually, you'll come to areas where fireballs shoot out from the floor. Since you can't stop Mario from running in this game, timing is of the utmost importance for you to get through it. Thankfully, the game places a pause block right where you need it. Mario stops when standing on this block, and won't start running again until you tap the screen. So you can take a second to breathe before heading back into action.

Since you can't stop Mario from moving forward, using the pause block can give you some much needed breathing room so you don't run into one of these fireballs. Don't take too long though: you've only got 90 seconds to get through! Alex Borkowski/Mic
Once you've made it through a couple particularly devious fireball traps, you'll land on a pause block right in front of Bowser himself, who's standing on a bridge with an axe behind him. Just like in the original Super Mario, your goal is to get behind Bowser and cut the chain holding the bridge up using the axe. Again, since Mario runs continuously, this can be sort of tricky.

Who leaves an axe lying around in their lava-filled castle of death? Honestly. Alex Borkowski/Mic
There are a couple ways you can go about getting behind Bowser. If you've got a super mushroom, you can always just bum rush him, take the hit and leap by while you're still invincible.
However, if you're small Mario it's best to wait. Bowser will leap up in the air before walking backward, then he'll walk towards you and shoot a fireball. If you jump while he's walking backward, you'll hit his shell and die. But if you time your jump when he's walking forward, you'll sail over him to cut the chain. You can also tap jump again while in the air to do a twirl, though Mario still moves down while this is happening. Once you make it across the bridge, this Bowser will then reveal himself to be a fake and fall into the lava. After a short cutscene in which the real Bowser flies away with Peach, you'll move on to the next world.
Super Mario Run 1-4 pink coin locations
As if it weren't hard enough to simply make it through the traps of "Bowser's Castle Hangout," you'll need some quick reflexes if you want to grab those pink coins which are hiding around.
The first coin requires you to be on the top portion of the stage, utilizing the monkey bar blocks. After climbing along the top of the stage for a little while, the blocks will end and you'll drop down, directly onto the first coin.

Prepare to get comfortable with the monkey bar blocks in Bower's Castle Hangout, since you won't be able to get the Pink Coins without them. Alex Borkowski/Mic
The second coin requires you to be on the bottom of the stage, ignoring the high ground that keeps you safe from the lava pits and fireballs. As you're running along the bottom, eventually you'll find another set of monkey bar blocks. The second coin will be at the end of a line of coins you can reach from there.

If you execute this correctly, you'll be on the monkey bars freely climbing towards the second Pink Coin. If not, then you've got a hot date with some fiery lava. Alex Borkowski/Mic
To get the third coin, you're going to have to get back to the top of the level. By utilizing a backflip brick which comes just after a destructible platform, you can jump on top of that platform and reach another set of monkey bar blocks, which will drop you off onto a platform just as a group of fireballs is going back down, allowing you to grab the coin.

The fireballs might seem scary, but you'll actually have more than enough time to grab the coin and keep running if you use the monkey bars at the top here. Alex Borkowski/Mic
The fourth coin requires a deft touch. As you run along the level, you'll see a floating platform with arrows pointing to the left. Jump onto this platform and then jump again, to grab to some monkey bar blocks that will drop you right onto an otherwise unreachable platform with the coin.

With some cool backflips and a healthy amount of climbing, it's not hard to get to the fourth coin in Bowser's Castle Hangout. Alex Borkowski/Mic
Finally, some quick wall jumps up a crevasse near the end of the level will let you grab (you got it!) another set of those monkey bar blocks which you can take all the way to a small platform with the last Pink Coin at the end.

If you can get the wall jumps down, little stands in the way of you grabbing the final coin of the level. Alex Borkowski/Mic.
And with that, all the pink coins in World 1 should be yours!
Walkthrough Super Mario Run World 2
Super Mario Run 2-1 walkthrough
• Super Mario Run 2-1 pink coin locations
• Super Mario Run 2-2 walkthrough
• Super Mario Run 2-2 pink coin locations
• Super Mario Run 2-3 walkthrough
• Super Mario Run 2-3 pink coin locations
• Super Mario Run 2-4 walkthrough
• Super Mario Run 2-4 pink coin locations
• Super Mario Run tips and tricks
In our last walkthrough for Super Mario Run, we showed you how to get through the World 1 and thwarted an imposter Bowser's attempts to impede our progress at rescuing Princess Peach. World 2 ups the ante by forcing you to learn new techniques and finding creative uses for old ones in order to combat its traps and puzzles. So let's get started, shall we?
Super Mario Run 2-1 walkthrough: "Ghost-Door Deception"
Halloween might have ended two months ago, but the first level of World 2 drops Mario into a haunted mansion with deceitful doors at every turn. The object of this level is simple: Find the door that leads to the next area, avoid the Boos that float around (and often stand directly in front of the doors you need to get through) and get out of this spooky mansion alive.
In practice, it's not so simple. This level consists of three parts, each with three doors in them, but only one leads to progress, while the other two send you back to the red door at the beginning. The correct door changes each time you play, so there's no way to memorize the correct route.
However, you can tell which doors are fake by the way they shake periodically, so it's worth standing on the pause block to observe which door doesn't shake. That's especially true in the first room, where you can see all three from the pause block.

You start this level on a pause block, which stops the timer. Use that to your advantage to see which door doesn't shake, representing the way forward. Alex Borkowski/Mic
The second room is a little trickier. The doors are positioned vertically, so you can't get a good look at at all three at once. The bounce pads in the room can also make it difficult to actually get where you need to go, so you're best off spending some time in this room getting a feel for the bounce pads (and looking for the pink coins).

Since this room is vertically oriented, it's a little more difficult to see which doors are fake, but you can always find out through trial and error. Alex Borkowski/Mic
The third room is, thankfully, much smaller, and if you can get to the top of it, you can climb around on a set of monkey bar blocks to see which door isn't shaking. Drop down to it at your leisure to go through and say farewell to "Ghost-Door Deception."

The monkey bar blocks on the top of this part of the level make it incredibly easy to see which door is real and which doors are fake, provided you take your eyes off the Boos. Alex Borkowski/Mic
Super Mario Run 2-1 pink coin locations
The pink coins in "Ghost-Door Deception" are tricky to find. There may be just three rooms in the entire level, but some of the coins are hidden and require multiple loops through the rooms to find.
The first coin is arguably the easiest one to get. Scale to the top of the first part of the level and you'll see it sitting on a ledge above the middle door. Just watch out for Boos and avoid heading through the correct door, which would kill your chances of grabbing all five coins.

With some deft dodging of the Boos in the early part of the stage to get to the top of it, the first pink coin should be pretty easy to grab. Alex Borkowski/Mic
The second and third pink coins are both in the second part of the level. The second coin is hidden in a vertical line of coins that you can activate by using the bounce pad furthest to the right of the screen. It will take one jump to activate the coin and then another jump to collect it. The third coin is sitting above and to the right of the top door, which, depending on the odds, might be the correct door to advance. So be careful and try not to head through it accidentally, just in case!

Coin Two (lower right) requires you to reveal it by jumping on the bounce pad to touch it before you can collect it. Coin Three (top left) only requires you to manage to reach it. Alex Borkowski/Mic
Coins Four and Five are in the final real room of the mansion and are a little easier to get. You can find the fourth coin by grabbing hold of the monkey bar blocks in the middle of the stage, but watch out, because a sneaky Boo loves to pop out of the first block and ruin your run.

While you grab the fourth pink coin, take a moment to consider how a ghost would even attach itself to the underside of a block, and why it would do so. It is a ghost, surely it has something better to do. Alex Borkowski/Mic
The final coin is hidden in a line of coins at the top of the stage. You can use the monkey bar blocks to make them appear and then collect them on a second pass, but it's time-consuming. Make sure you leave yourself enough time to get to the exit as well!

Although Mario has mysteriously vanished from this image, you'll need to cross the top of the stage on the monkey bars once to activate the fifth coin, and then once more to collect it. Alex Borkowski/Mic.
Super Mario Run 2-2 walkthrough: "Sky-High Lifts and Leaps"
If your main complaint about "Ghost-Door Deception" was that there simply weren't enough opportunities to send Mario falling to his death in the clouds, then you're in luck. "Sky-High Lifts and Leaps" has pitfalls aplenty for everyone's favorite red-shirted plumber. You better be prepared to leap from falling platforms and dodge Bullet Bills if you're looking to make it through to the next area.
The gimmick of "Sky-High Lifts and Leaps" is the yellow platforms that either move along with you or wait until you step on them to move. The latter move along a fixed path and then launch themselves off the rails. That can lead to a quick end for you if you're not good about timing your jumps. Other than that, the stage is very straightforward: Run along the tops of the platforms, avoid the Bullet Bills and make it to the flag at the end of the stage.

Some of the yellow platforms in 2-2 will launch Mario into the air (and into the path of Bullet Bills) before plummeting off the screen. So don't stay on them any longer than you have to. Alex Borkowski/Mic
About halfway through the level, you'll also notice a purple block with what appears to be a wildly spinning clock in it. If you hit it, you'll get an additional 10 seconds on your timer, which will allow you slightly more wiggle room when it comes to finishing the stage.

Hit this block for an extra 10 seconds to finish a stage, or run right past it because you don't need it! The choice is yours. Alex Borkowski/Mic
The last thing of note in 2-2 comes about two-thirds of the way through the stage, when you'll come across a blue switch with a white "P" on it. Hitting this switch (either by jumping on it or hitting the jump button while vaulting over it) will cause it to spawn a number of blue coins for a limited time. Each coin you collect this way will add two coins to your total, so it's well worth it to trigger the switch and collect as many as you can!

Hitting this switch will spawn a number of blue coins worth double the regular gold coins, but make sure you hold the jump button after you trigger it because Mario has a bad habit of flubbing the follow-up jump and missing the next platform entirely if you don't. Alex Borkowski/Mic
Super Mario Run 2-2 pink coin locations
Much like 1-3, the last high altitude level we covered in Super Mario Run, the pink coins in "Sky-High Lifts and Leaps" will require you to make some precise jumps. You'll also have to tangle with a few Bullet Bills.
The first coin is near the beginning of the stage, at the top of a series of platforms that launch you higher into the air each time. The coin is in a small clump of them at the top of your jump, so wait until you see the platform reach its peak and begin to fall before trying to grab this coin or you'll come up short.

Jump too soon and you won't be able to reach this coin, but jump too late and the Bullet Bill flying by will get you. Alex Borkowski/Mic
The next coin seems like it's a gimme. You land on a platform and the coin is directly to your right, but it's not that simple. The platform moves in a counter-clockwise motion. So you either have to wait for it to make a full rotation or you can just wait until you're under the coin as the platform descends and jump for it.

If you're impatient, you can wait for the platform to lower a little before jumping to collect the coin, but it doesn't take that long for the platform to complete a full rotation either. Alex Borkowski/Mic
The third coin is the easiest to mess up because it requires you to vault off a Bullet Bill just right in order to grab it. If you're going to miss one, chances are this is the culprit.

It seems a little excessive to leap off a moving bullet with an angry face on it just for a differently colored coin, to be perfectly honest, but that's what you have to do in order to grab coin three. Alex Borkowski/Mic
The fourth pink coin is on a platform at the end of a short series of leaps, but the momentum can be kind of tricky to get down. Be careful or Mario could go sailing off the edge of the screen entirely. You can wall-kick your way back to a lower platform and try again, but it's not an exact science.

There's a good chance this platform will be moving down by the time you get there, so you should jump a little earlier than you think you need to in order to land on it and not collide with the far wall. Alex Borkowski/Mic
After a lot of leaping and falling, the final coin for the level gives you a much-needed break. It sits perfectly still on an easily reachable platform near the end. It's pretty difficult to miss, even if you've been breezing through the level.

As long as you wait for the platform to reach the upper right-hand corner of its path, you'll have no trouble grabbing the final coin for 2-2. Alex Borkowski/Mic
Super Mario Run 2-3 walkthrough: "Treasure-Hoarding Swoops"
Another world, another cave level. Level 2-3 is lousy with small blue bats called Swoops, and it will test your ability to jump off moving enemies in order to reach high places and coins. That's no easy feat.
The level begins with a tantalizingly placed Super Mushroom directly in your path, but watch out! A Swoop will make its way towards you while you're trying to grab it, and if you're not careful you could end up back at the beginning of the level, or lose the effect of the Super Mushroom almost immediately.

Getting a Super Mushroom this early can make the rest of the level a lot easier, but that Swoop chilling just underneath it can really ruin your day if you're not careful. Alex Borkowski/Mic
A little later in the level, you'll come across another blue "P" switch. Unlike the one in "Sky-High Lifts and Leaps," you're going to want to stay on the ground to collect as many of the blue coins as you can.

Hop off that Swoop and onto that switch! The blue coins will also lead you right to one of the pink coins in the area, provided you're able to make a tricky jump. Alex Borkowski/Mic
As long as you keep avoiding the Swoops and the pits placed all over the level, it won't be long until you reach a Red Coin Ring, which will (as usual) spawn a Super Star you can use to really rack up the coins and trivialize most of the rest of the level. However, getting some of these coins will require you to bounce off a few Swoops while in the air, and the final coin has a nasty habit of disappearing right as you're trying to grab it, so it pays to be quick as well.

The first few red coins aren't too hard to grab, but the last two require you to vault off that Swoop in the air, and the last one is easy to miss even if you can pull all that off. The Super Star they give you is more than worth it though. Alex Borkowski/Mic.
Super Mario Run 2-3 pink coin locations
Unlike "Wall-Kicking It Underground," the cave level from the previous world, most of the pink coins in 2-3 are pretty easy to spot, if not always easy to grab. You'd better be ready to jump off some Swoops!
The first pink coin is at the top of a wall near the beginning of the stage. It's not hard to jump on the pink and green rock platforms in order to grab it, but even if you mess that up some quick thinking with a wall-kick can get you onto the higher platform where you can try to grab it again. It's basically a gimme.
Even if you opt to go the lower route, it's not hard to wall-kick onto the green platform here and get a second chance at the level's first pink coin. Alex Borkowski/Mic
The second coin is much harder to grab. Right after the blue "P" switch, you'll have to leap up onto another green block, jump, and then hit the approaching Swoop just right in order to grab it. It's probably the most easily missed coin in the level.

The blue coins from the P switch will guide you right to the pink coin, but even then you might not make it without some serious skill and/or luck. Alex Borkowski/Mic
The third coin is right above a pipe that will take you to the next part of the level. Just jump above the pipe to avoid progressing forward, then wall-kick off the wall and you should be able to grab it with little trouble.

Jump right as you climb up onto the second platform and then wall-kick off to grab this coin before advancing to the back half of the level. Alex Borkowski/Mic
The fourth coin is in a Swoop and pit gauntlet. Thankfully, it's not that hard to navigate as long as one of those pesky bats doesn't end up directly in the path of your jump.

The Swoops and other coins can make this particular pink coin a tough get, but it's also the easiest to grab on the fly. Alex Borkowski/Mic
The final coin looks like it's going to be a doozy to get, but there's a secret way just in case you mess up the initial attempt. Near the end of the level, you'll reach several Swoops flying in a diagonal line. If you can pull off a series of increasingly tense jumps, you can hop off each Swoop and onto the next one, eventually jumping and collecting the coin.
If you're unable to pull off that feat, don't despair. There's a bounce pad at the bottom of the area, and if you're quick enough, you can use it to wall-kick off the right-side wall and grab the coin even if you've already missed the Swoops.

Even if you don't perfectly nail the multi-Swoop jump this coin requires, you can still get another crack at it by utilizing the bounce pad at the bottom of the level and a well-timed wall-kick. Alex Borkowski/Mic.
Super Mario Run 2-4 walkthrough: "Airship Cannons... Fire!"
The final level of World 2 should be familiar to anyone who's played Super Mario Bros. 3. "Airship Cannons... Fire!" puts you on the deck of Bowser's airship. This ship is lousy with cannons firing cannonballs at you and little guys called Ninji that jump up and down, making them really hard to stomp.
The level starts you off running with two cannons firing diagonally at you — if you're feeling brave, you can stomp on the cannonballs and tap the jump button again in midair so Mario twirls, a maneuver that can give you the frames you need to avoid getting hit, but it's finicky at best.

This level gets a little busy with the sheer amount of dark shapes hopping and flying around, but after a few tries you'll get it down. Alex Borkowski/Mic
Other than that, focus on just getting through. It's going to be frantic the first few times, but hitting some of the question blocks might net you a Super Mushroom that'll let you take another hit, which will really help you out as you go through the level. The question block you definitely don't want to miss comes at the end of the level. It contains a Super Mushroom that you definitely want grab as you head into the boss battle.

If you're not confident in your ability to get three hits on the boss without getting hit yourself, you'll definitely want to grab this conscientiously placed Super Mushroom right before the fight. Alex Borkowski/Mic
Fans of Super Mario Bros. 3 or the SNES's Super Mario World will recognize this boss fight by its mechanics. You have to hop on the Koopaling (this one is named Boom Boom) three times while he windmills his arms around. You can change the direction Mario runs in by wall-kicking off the walls. It's best to hang out on the far wall and wait for Boom Boom to approach before leaping off and stomping his head. He'll speed up each time, though, so watch out!

Although Boom Boom shares a few cosmetic features with Roy Koopa, the boss of World 5 in the SNES's 'Super Mario World', without those flashy pink glasses, it's just not the same. Alex Borkowski/Mic
And with that, World 2 is kaput! Off to World 3!
Super Mario Run 2-4 pink coin locations
You'll probably spend the first few times on "Airship Cannons... Fire!" getting familiar with the cannons. But once you get your sea (air?) legs, you'll be able to grab the coins in no time!
The first pink coin appears soon after you land on the airship. You should see it floating above two cannons, and all you need to do is jump off one of the cannonballs and use the added height to grab the coin.

Although it seems counterintuitive to Mario's safety, you'll have to launch off these cannonballs in order to grab the first coin of the level. Alex Borkowski/Mic
The second pink coin has a similar conceit, but this time you'll be bouncing off a Ninji's head to grab it. Make sure to avoid colliding with the cannons firing nearby. It's a little tricky, but still pretty easy to nab.

Vaulting off the Ninji here is the only way to grab this pink coin, but be careful not to jump too early and get plugged by one of the cannonballs! Alex Borkowski/Mic
The third coin is only hard to grab if you've successfully hit the question block on the platform above it, which will release a Super Mushroom that might distract you. This pink coin is floating with a bunch of regular coins in the shape of an arch. Additionally, watch out for the Ninji hopping up and down underneath or it might launch you too high or knock you back instead.

No need to hop on the Ninji to get this pink coin, but if you do, there's a special surprise waiting on the higher platform: a Super Star hidden in a question mark block that will make your life immensely easier. Alex Borkowski/Mic
The fourth coin is in another cluster, but it's way high up in the air. Grabbing the Super Star from the question block a little earlier will make this coin an easy get. If you don't get the star, you need to carefully bounce off not just one but two cannonballs in order to get the required height. Nerve-wracking, but doable.

A step up in difficulty from the first coin, you'll have to chain your jumps off two cannonballs to grab this tantalizing pink coin. Alex Borkowski/Mic
After the last two pink coins, you probably need a break, and the game designers are (somewhat) happy to oblige. The final coin is guarded by a Ninji standing behind a cannon next to a pit. Hit that Ninji just right and you'll sail directly into the coin.

Getting the last pink coin in the level will require you to hop off a Ninji who's hiding behind a cannon on the lefthand side. Alex Borkowski/Mic
Congrats! Now you've got all the pink coins for World 2 and can start trying to find the purple and black coins in each area, which are much harder to grab on a single run.
Walkthrough Super Mario Run World 3
What you'll find in this guide:
• Super Mario Run 3-1 walkthrough
• Super Mario Run 3-1 pink coin locations
• Super Mario Run 3-2 walkthrough
• Super Mario Run 3-2 pink coin locations
• Super Mario Run 3-3 walkthrough
• Super Mario Run 3-3 pink coin locations
• Super Mario Run 3-4 walkthrough
• Super Mario Run 3-4 pink coin locations
• Super Mario Run tips and tricks
We're a little over one-third of the way through our Super Mario Runwalkthrough. In World 1, we thwarted Bowser's attempts to stop us in his castle, and in World 2, we defeated the Koopaling Boom Boomwho was in charge of an airship. World 3 offers one new level and three levels that are variations on something we've already seen.
Even if you've started getting more sure in your footing in this new incarnation of the Mushroom Kingdom, there are sure to be some surprises and new tricks up Bowser's sleeves (er, spiky wristbands). So read on for all the tips and tricks you'll need to get through the third world of Super Mario Run, and of course the locations to all the pink coins.
Super Mario Run 3-1 walkthrough: "Big Spiny Blitz".
"Big Spiny Blitz" is the first desert level you'll go through in Super Mario Run. It has a few special tricks you'll need to master in order to progress through it.
The first of these new twists is the yellow exclamation switch: By stepping on this, you can make red blocks appear (albeit temporarily) at various points in the level. You'll be able to see where these blocks will appear by the dotted outlines they have before you hit the switch. Use this as a hint to see where you ought to go.
 The yellow exclamation mark block will make red blocks appear on the bottom of this area, allowing you to grab the Super Mushroom that's currently blocked off by the red blocks below it. Alex Borkowski/Mic

The second twist is the Spinies themselves: They look like giant red-shelled turtles with spikes all over. Naturally, stepping on these turtles will be deleterious to Mario's well-being, but you can get by them by hitting the blocks they're walking on or just grabbing a Super Star in the level, which will make short work of them.
 If the giant spikes on their backs weren't already a tip-off, don't jump on the Spinies. Either knock them off breakable blocks or tear through them with a Super Star. Alex Borkowski/Mic

Aside from that, the main thing to look out for in this level is the Red Coin Ring. It'll take some smooth wall-jumping to get it, but if you can do that and grab all five of the coins, the Super Star will make your journey through the level a lot easier.
 Put that wall-kicking to good use and grab the Red Coin Ring in 3-1 to give yourself a break on the back half of the level. Alex Borkowski/Mic.

Super Mario Run 3-1 pink coin locations
The first pink coin in 3-1 will be staring you right in the face as soon as you start the level, since a Lakitu is holding it hostage while tossing all manner of coins at you from the sky. The easiest way to get this specific coin is at the third exclamation switch: If you let Mario begin climbing on it before vaulting off, you'll trigger the switch and get the height you need to snatch the coin away from that Lakitu.
 The Lakitu in this level will (thankfully) only throw coins at you in this level, and your only chance to grab his pink coin is with some flawless platforming. The third exclamation mark switch is probably your best chance to grab the coin from him. Alex Borkowski/Mic.

The second coin is easily reached from the top of a triad of those three moving platforms we first encountered back in level 2-2. This is also a great opportunity to kill two birds with one stone and grab the coin from the Lakitu as well, but this is more luck than anything else.
 This coin is probably the easiest to grab, but with some good timing you can also grab the Lakitu's coin as well. Alex Borkowski/Mic.

The third coin is near the top of a bunch of cloud platforms, so as soon as you see the opportunity to start ascending up the level vertically, you should take it. If you can't make it or whiff one of the jumps, you're not going to be able to grab this coin.
 The edge of this platform comes up fast, and it's a bit of a leap to the pink coin, so don't be discouraged if you completely bail the first few times. Alex Borkowski/Mic.

The fourth coin is also accessible from a small elevated cloud platform. You can easily get it if you follow the red coins up the level after triggering the Red Coin Ring. The best-case scenario is you grab the coin automatically once you trigger the Super Star after collecting the coins, but even if you flub that, you're still in a perfect position to get the coin.
 Lining up this jump can be tricky but if you wait until the last cloud to jump and hold down your jump button while doing so, it shouldn't take long to grab it. Alex Borkowski/Mic

The final coin is likely to trip you up if you're looking for a pattern: It's on the lower part of the stage with a long line of red blocks. If you're still under the effects of the Super Star, it won't matter because you'll pick it up as you run by it. But if you missed the star or got caught on the geometry of the level, you'll want to try for the lower half (avoiding the Spinies and Piranha Plants, of course) and grab it.
 If you roll off the edge of this red platform, you *might* be able to grab the coin, but it's easiest to navigate the Piranha Plants on the lower level in order to make sure you can grab it. Alex Borkowski/Mic.

Super Mario Run 3-2 walkthrough: "Bullet Bill Barrage"
It's not ever explained how Mario keeps getting up into the sky for some of these levels, but 3-2 ups the ante from the previous levels by forcing you to run away from Bullet Bills coming at you from both sides of the screen.
As soon as the level starts, you can grab a Super Mushroom from the question block, but do it quickly because a red Bullet Bill is going to be hot on your heels. He has a nasty habit of accelerating once he goes about halfway across the screen.
 Launching yourself off the Bullet Bills in this level is really fun, but can often lead to some unintended consequences. Alex Borkowski/Mic.

Eventually you'll reach a point where three red Bullet Bills show up one after the other in a vertical line. Don't freak out! If you just run along the ground, Mario will roll onto a lower platform and they'll harmlessly pass overhead. The timing to jump over them will be way harder to pick up.
 Follow the Super Mushroom to safety, and don't try to jump over this three stack of red Bullet Bills. Alex Borkowski/Mic.

This will happen again at the very end of the level. A bunch of red Bullet Bills will show up from the opposite side of the screen, but if you're making your way up the cloud platforms, you'll be able to leap free of them just in the nick of time. If you reach the castle flag at the end of the level, all enemies on-screen will be converted into coins, making this a great way to get some points at the end of the level.
 Just like in old Mario games, there are enemies on the screen when you grab the flagpole, so the end of 3-2 is a great opportunity to make some coins. Alex Borkowski/Mic.

Super Mario Run 3-2 pink coin locations
The first pink coin in the level is on a platform you'll jump onto at the start of the level. Ignore the line of gold coins indicating you upward and you'll run right into it, but be prepared to jump afterward. There's a Bullet Bill on your tail, and the platform ends almost immediately after the coin itself, so jump!
 The platform ends immediately after the pink coin, but the Bullet Bill starts accelerating once it gets halfway across the screen, so you'll need to work quickly if you want to grab the coin and avoid getting hit. Alex Borkowski/Mic.

The second coin will require some fast jumps. After a break in the cloud platforms, you should be able to hop up to a higher platform with the help of a Bullet Bill. Soon after, a red and black Bullet Bill will approach you from either side of the stage. Hop on the red Bullet Bill and then the black one and you should grab the coin that's suspended high up in the air.
 If you successfully hop off both the Bullet Bills, you'll easily grab the coin, but it can be tough to spot and is a bit of a leap of faith. You can also unlock Luigi by getting 150 green and purple Toads to come back to your kingdom through Toad Rally and buying his house. Alex Borkowski/Mic.

The third coin requires you to leapfrog off three black Bullet Bills coming from the righthand side of the stage. It's easy to miss these jumps, but thankfully the coin is just hanging out on a high platform so once you get up to the platform you should be in business.
 Once you're on the platform, it's not hard to grab the coin, but it can be tricky to jump off three Bullet Bills in quick succession. If you tap your screen after you jump, Mario will twirl, which can give you the time you need to make your hit connect. Alex Borkowski/Mic.

The fourth coin is on top of a question block after the Red Coin Ring. It's hard to miss this one, but if Mario's in the middle of a roll and you can't hop on top of it quickly enough, it could still pass you by.
 After the last few high-flying coins, the simplicity of one sitting on a question block is a much-needed break. Alex Borkowski/Mic.

For the final coin, you'll come across a split path near the end of the level, and you should take the lower path here. What you miss out on in terms of gold coins, you'll make up for in netting the final pink coin — plus you won't have to deal with Bullet Bills stacked three high, which can really put a damper on your run.
 Unless you're under the effects of a Super Star, you'll have to be on the lower level of this part in order to grab the coin (and avoid getting creamed by the multiple Bullet Bills). Alex Borkowski/Mic.

Super Mario Run 3-3 walkthrough: "Shell Me the Way"
Knocking over turtles and using their shells as projectiles has been a staple of Mario games since the beginning of the series, but "Shell Me the Way" is the first level where you can use it to your advantage. It's also the first level that's almost the title of a Peter Frampton song, but that's neither here nor there.
Level 3-3 is full of flat areas with lots of enemies, and by knocking out a Koopa at the beginning and running to keep up with their shell, you can rack up a big coin combo as the shell knocks enemies out of your path. It makes you feel incredibly powerful, so enjoy it!
 Mostly, 3-3 tasks you with keeping up with the Koopa shells you launch so that you can grab the most coins out of the combos it creates. Alex Borkowski/Mic

Although the bulk of the level exists to let you launch Koopa shells at unsuspecting enemies, there are still some tricky parts, like the Super Star trapped in a container made of breakable blocks. You'll have to use a Koopa shell to have enough room to maneuver under the blocks, but if you're not quick enough, the shell will shoot back toward you and take away your Super Mushroom power. You'll need to have a power mushroom in order to break the blocks below the star and get its power.
 If you want the Super Star in here, you'll have to be Super Mario, which means avoiding the shell you used to make a path big enough for him when it comes back your way. Be ready or you'll have to run by it, thinking about what could have been. Alex Borkowski/Mic

The final part of the level that's likely to trip you up is a split path. You'll want to stick to the upper platform because the bottom portion is riddled with Munchers, and setting foot down there without a Super Star is a recipe for certain death.
 The Munchers may look much cuter than the Piranha Plants, but they're invulnerable. You'll be in for a nasty surprise if you step on them instead of jumping on that safe platform above them. Alex Borkowski/Mic.

Super Mario Run 3-3 pink coin locations
The first coin in 3-3 isn't hard to spot, but can be tricky to get. It's at the tail end of a line of coins and you'll need to bounce off the Goombas marching toward. you near the start of the level. But even if you hit the jump perfectly, Mario still has an annoying habit of soaring just underneath it.
 Mario will climb over most enemies, so it's best to ignore the first Goomba that way and vault off the second one if you're looking to grab the first pink coin of the level. Alex Borkowski/Mic

The second coin will require you to jump onto a few brick blocks a little above the action. After launching a Koopa shell at a bunch of Goombas on a bridge, jump off the hill leading down and you should land on top of the blocks. Continue on this upper set of platforms until you see the coin.
 It's possible that with some deft jumps you could get on top of the question block and grab this coin, but it's much easier to leap off those breakable blocks and onto its platform instead. Alex Borkowski/Mic

Eventually, you'll land on a diagonal pause block and should be able to see the third coin a ways up, at the end of another line of coins and guarded by a Paratroopa. The block will cause you to jump automatically when you get off it, so line up that Paratroopa in your sights and use him to boost yourself to the third coin.
 The timing on this one can be tricky: Jump when the Paratroopa is too low, and you won't get the coin or clear the platform, but jump when he's too high and you'll collide with him and won't vault off him at all. Thankfully you can chill at the pause block for as long as you need to get the timing down. Alex Borkowski/Mic

Almost immediately after the third coin, you'll see a green Koopa. Make sure you hit him and launch his shell, because the fourth coin is hidden at the bottom of a crevasse and walled off by a bunch of brick blocks, and only the shell will be able to break those for you. It'll also collect the coin automatically for you as an added bonus!
 Don't ignore the pause block if you want to see the Koopa shell destroy all these blocks below you and grab the coin. It's cool to see and you've earned a break. Alex Borkowski/Mic
The fifth coin is tricky, but not impossible to do if you're looking out. Right before the final stretch of the level with the Munchers, you should see a launch block that you can use (with proper timing) to propel yourself onto a block that's a little higher. Keep ascending the brick and wood blocks you find, and after a little bit of finicky platforming, you'll see the final coin resting on a high perch.
 It's going to require precise jumps to get this final coin, but even if you jump off the first block and not the second, you should be able to reach the upper platform and grab the coin. Alex Borkowski/Mic.

Super Mario Run 3-4 walkthrough: Fire Bar Castle! Youch!"
Level 3-4 helps us to figure out the pattern of Super Mario Run's final levels: Stage 4 of an odd level will be a Castle (like we saw in World 1) and stage 4 of an even world will be an Airship. "Fire Bar Castle! Youch!" lives up to its namesake by, well, being full of Fire Bars, big rotating lines of fireballs that you've got to navigate your way through in order to beat Bowser at the end of the level.
To that end, 3-4 is full of long hallways with fire bars rotating around them, so it's imperative you keep moving. The longer you get stalled on pause blocks or the level's geometry, the bigger chance there is that you'll end up toasted.
 The Fire Bars are tricky to navigate, but this level throws a lot of Super Mushrooms at you, so you're rarely ever required to spend long stretches of the level only able to take one hit. Alex Borkowski/Mic

As if that weren't bad enough, Fire Bar Castle brings back those pesky fireballs from Bowser's Castle Hangout in World 1. Although nowhere near as prevalent as in the previous level, they're still a pain in the neck to dodge. This level is full of diagonal pause blocks that force you to jump off them: Time it poorly and you're getting a face full of fire.
 The fireball traps are actually less frustrating than they were in Bowser's Castle Hangout because you're always allowed to take a breather and get their patterns down before jumping. Alex Borkowski/Mic.

Finally, Bowser has installed some additional protection on his flimsy bridge, and you'll have to deal with a Fire Bar as well. Don't wait too long, though, because when Bowser jumps up now, he breathes a fireball diagonally that'll catch you if you're on the pause block. Usually the best strategy is to have a Super Mushroom, take a hit on the chin and run past Bowser while you're invincible.
 If you take too long waiting for the Fire Bar to rotate around, Bowser will blast you with a fireball as he jumps. Wait for him to start walking forward before jumping over him for the best chance to make it over without getting hit. Alex Borkowski/Mic.

Super Mario Run 3-4 pink coin locations
The first pink coin is right at the start of the level on top of a platform. If you're using a character with a higher jump like Luigi, you can get to the platform via the diagonal pause block below it, but if you're playing as Mario, it's a trap! Jump over the pause block and then again, and you ought to make it up to the platform with the coin.
 The diagonal pause block won't give you the height you need to get up to this platform, so you'll have to hop over it and then leap off the edge of the platform in order to make it up. Alex Borkowski/Mic.

The second coin is perched on the side of a small pit with a Fire Bar in it. With some fast jumping, you can grab the coin and leap up to the higher platform, avoiding the trap below. But if you're not fast enough on the draw, you'll end up tumbling down into the Fire Bar below.
 While it's feasible to grab the coin and tumble down into the pit with the Fire Bar, you're probably going to take a hit doing that, so if you can you're much better off grabbing the coin and leaping up to the upper platform to avoid the trap altogether. Alex Borkowski/Mic.

To get the third coin, you're going to have to take the high road when the option is presented to you. After dodging numerous Fire Bars, you'll see a diagonal pause block you can use to jump up to a higher platform, and you should take it. You'll see the coin on a path below you, but be warned that you'll probably eat a hit from the Fire Bar directly after it once you've done so.
 You'll have to roll off the platform before this one in order to avoid the risk that Mario will grab onto the other upper platform after the jump. Thankfully the Fire Bars here are shorter than in previous sections, so you should be able to clear them safely without a Super Mushroom. Alex Borkowski/Mic.

You'll have to contend with some fireballs in order to get the fourth coin. After the Fire Bar gauntlet, you'll come across a series of lava-filled pits with fireballs shooting out of them: Take advantage of the diagonal pause blocks (and the fact that the timer stops while you're on them) to time your jumps across the pits; the coin should be on the opposite side of the last pit you need to get across.
 This is probably the easiest coin to get in 3-4, but take your time just the same. You might as well! Alex Borkowski/Mic.

The final coin is easy to see. Right before the final fireball trap, you should see it as you emerge from a tunnel full of Fire Bars, so roll off the ledge instead of jumping to grab it.
 It can be tough to decide between the pink coin and the Super Mushroom that rests directly above it, but you can always grab the coin, jump into the lava and use one of your lives to go back just far enough to grab the Mushroom as well. Alex Borkowski/Mic.

Now you've got all the pink coins in World 3. Nothing to it, except for all the tricky platforming!.
Walkthrough Super Mario Run World 4
What you'll find in this guide:
• Super Mario Run 4-1 walkthrough
• Super Mario Run 4-1 pink coin locations
• Super Mario Run 4-2 walkthrough
• Super Mario Run 4-2 pink coin locations
• Super Mario Run 4-3 walkthrough
• Super Mario Run 4-3 pink coin locations
• Super Mario Run 4-4 walkthrough
• Super Mario Run 4-4 pink coin locations
• Super Mario Run tips and tricks
Now that we're in World 4 of Super Mario Run, we've officially reached the back half of Nintendo's new mobile game, which has only been live on iOS for about a week.
By way of a quick recap: Previously, in World 3, we took a break from dodging over Spinies in the desert to goof off in the clouds (and dodge Bullet Bills). Prior to that, we spent time in a haunted house and a cave in World 2, and we started our run in World 1, which was a variation on the first world of the original Super Mario Bros. for the NES.
World 4 will introduce a novel new level design for us (with the last truly new assets of the game), another level with a contrivance and our third cave level. It finishes with another Airship to bust up.
If you're new to the game, why not start with our guides for World 1, World 2 and World 3? Then you can read below for tips on World 4. Without any further delay, let's launch right in!
Super Mario Run 4-1 walkthrough: "Cutting-Edge Spire"
From the moment you start level 4-1, you'll notice that it's... tall. We've seen vertical portions previously in the second room of 2-1, "Ghost-Door Deception," but "Cutting-Edge Spire" is unique in that it's almost entirely vertical, save for a small bit at the end of the level.
 After three straight worlds of running to the right, having to do that while climbing an impossibly tall tower can be a little disorienting, even more so with the traps that show up in the latter half of the level. Alex Borkowski/Mic
Getting Mario to reverse his direction will require you to take a page from your fight with Boom Boom on the airship back in 2-4: When Mario wall-kicks off a wall, the direction he runs will reverse, allowing you to traverse the level and grab the pink coins. This is pretty easy for the first half of the level where all you're contending with are some Dry Bones (the skeletal Koopas you've seen in Bowser's Castle Hangout back in 1-4) and some platforming that'll only cost you time if you flub it. It becomes decidedly trickier when you reach the second half of the level, which introduces gauntlets of mobile and immobile buzzsaws (because why not).
 If these are in fact cogs and not buzzsaws, the teeth are still suspiciously sharp and they'll still hurt you if you touch them, so don't! Alex Borkowski/Mic
Once the buzzsaws are introduced, you'll have to be more careful in your timing when it comes to climbing the spire. You can stall out some of the moving buzzsaws by not wall-kicking off the walls when Mario reaches them, and this will be necessary for some of the pink coins.
To offset a lot of this, you get 99 seconds (as opposed to the 90 you get in other levels), and "Cutting-Edge Spire" gives you not one but two timer blocks (first seen in "Sky-High Lifts and Leaps") for an additional 20 seconds.
 Even if you don't think you'll need the extra time, you might as well try and grab the timer blocks as you pass under them. Alex Borkowski/Mic.
Super Mario Run 4-1 pink coin locations
Getting all the coins in "Cutting-Edge Spire" will take some practice. The level has ways of denying you the ability to try multiple times for each coin, which comes as a surprise since it's one of the few levels that isn't scrolling horizontally.
The first coin is hidden behind a series of brick blocks, but by hitting the blue P switch to the right of them, you'll turn those blocks into coins. This one is hard to miss because chances are you'll already be running toward the switch when you get up to the platform it's on, and it's easy to vault off it and activate it.
 Even if you miss the coin on the first go-through, all you have to do is clear a path to it, since any coins you collect won't turn back into blocks when the timer runs out. Alex Borkowski/Mic
The second coin utilizes the P switch as well, but for the opposite purpose. A little farther up the level, you'll see three brick blocks on the right side of the stage, and a bunch of coins in a conspicuously platform-like formation — don't grab them yet! If you hit the block farthest to the right, it'll create another blue P switch. Activate it, and those coins will turn into bricks, allowing you to cross them and grab the second pink coin, which is sitting on top of a yellow pipe.
 You'll only get one shot at grabbing the pink coin once you've activated the P switch: It won't come back after you've used it. Also, there's a bounce pad at the bottom middle of this portion of the level, so avoid using that if you want to collect the coin. It'll rocket you past it and onto a platform you can't get down from, spoiling the whole run. Alex Borkowski/Mic
Getting the third coin requires you to do some artful buzzsaw dodging in the latter half of the level. There's a platform below these two buzzsaws that'll allow you to nail the timing down. What you want to do is get a big enough gap to where the lower buzzsaw is to the left of you and the higher one is to the right. That'll allow you to pass through both and grab the coin. The upper buzzsaw is much faster than the lower one, though, so don't take too long!.
 Alternatively, you can just take the hit with a Super Mushroom and use your temporary invincibility to grab the coin. It'll make the next section harder, but it's much easier than timing your jumps. Alex Borkowski/Mic
The fourth coin rests in a small covered alcove in a group of coins, which would normally be cause for celebration. However that alcove is surrounded by two rotating buzzsaws, so you not only need to avoid them as you're getting inside but also after grabbing the coin and leaping out. If you hop onto the side of the alcove where the coin is and jump near the very bottom, you can collect the coin and give yourself a few seconds to time your escape.
 There's also a Red Coin Ring at the bottom of the buzzsaw's path, but your timing will have to be uncommonly good in order to grab all five red coins, the pink coin AND avoid the saws in one smooth motion. Alex Borkowski/Mic
Finally, the fifth coin is perched atop the door leading out of the Spire in the shape of a clock. Simply avoid the the door and wall-kick up to the perch where the coin is. It's a well-earned break after the last four coins.
 So long as you can avoid the door to the end of the level, it's not hard to wall-kick up to where the final pink coin is. Alex Borkowski/Mic.
Super Mario Run 4-2 walkthrough: "Slope to Success"
Remember way back in 1-2 when you had the opportunity to slide down a long hill and knock out a bunch of Goombas, but you had to cut it short if you wanted to collect the third pink coin in that level? Well, the designers of Super Mario Run sure did, so 4-2 is an entire level dedicated to letting Mario slide down hills and knock unsuspecting enemies out of the way.
The early portion of level tasks you with sliding down long hills and knocking enemies out of the way, taking in the scenery and the music (if you haven't gotten tired of it already).
 Mario won't start sliding until you jump onto a slanted platform, so the game helpfully indicates what you're supposed to do with this arch of coins at the very beginning of the level. Alex Borkowski/Mic
Until about two-thirds of the way through the level, your main task is sliding when you're able to. You'll also occasionally need to find your way back to the level using wall-kicks or bounce pads, though the latter will only work if you have a mushroom because of the blocks positioned above them. Eventually, though, you'll reach a small blue and yellow cannon that you can (and should) hop into. Once you do, it'll spawn a bunch of blue coins that you can launch yourself through to get some extra cash.
 Using the cannon will start a timer and spawn some blue coins, but don't try to shoot yourself out of it immediately: the cannon's initial firing position is a straight 90 degrees, which will launch Mario headfirst into the green pipe on the opposite side and into the bottomless pit below. Alex Borkowski/Mic
If you're going to die in 4-2, it's definitely going to be at the end when you have to leap from one floating slide platform to another. For whatever reason, the game sometimes has trouble registering your jumps, causing Mario to confidently fly off the side of the stage to his untimely demise. It's sort of funny and weird to see happening in real time, but it can still be frustrating if it costs you a good run.
 There's five of these platforms, and without very precise jumping Mario will go sailing off of them and into the wild blue yonder without a second thought, so don't let that happen to him! Alex Borkowski/Mic.
Super Mario Run 4-2 pink coin locations
Unlike 4-1, "Slope to Success" starts you off with an incredibly easy coin to get. It's over a pit after you finish your first initial slide, and all you have to do is hop over the pit to get it.
 It would probably be harder to not get this coin than to get it, especially if you're chasing that Super Mushroom from the question block just before it. Alex Borkowski/Mic
The second coin is trapped in a bunch of breakable blocks a little bit further into the level. You can use the bounce pad underneath to break them and get the coin, but only if you're Super Mario. So watch out for the Paratroopa who's floating around just before you get to this coin. It's reminiscent of how you grab the Super Star in "Shell Me the Way" except now not being Super Mario is denying you those sweet, sweet Rally tickets instead of just a power up.
 Without Super Mario's uncommonly thick dome, you won't stand a chance of busting through those blocks and grabbing pink coin number 2. Alex Borkowski/Mic
To get the third coin, wall-kick up the path in between the two green pipes and the righthand wall to get to another hill you can slide down. Try to keep your momentum going to get onto another hill to the right of that. You should see the coin floating above the end of the platform. Jump high enough, and it's yours!.
 With some skillful sliding, you should be able to launch yourself off this platform and into the waiting (metaphorical) arms of the third pink coin above. Ramp it! Alex Borkowski/Mic
You'll have to be ready for the fourth coin because it comes almost immediately after the third. Use the bounce pad as soon as you see it to launch yourself through a long line of blocks and into the pink coin, hidden at the top. Again, you'll need to be Super Mario for this to work. So watch out for enemies.
 With the amount of time Mario spends hitting things with his head, his chiropractor bills must be outrageous. Good thing he collects gold coins for a living. Alex Borkowski/Mic
The final coin is right after the blue coin cannon. As you're sliding down the hill that comes directly after it, you should see the coin at the end of a short jump. The same rules apply from coin 3 here, so make sure you ramp it off that platform to grab the coin.
 Failure to ramp it will result in Mario just absolutely whiffing, and he can only hope the Goombas below weren't watching him while he attempted to grab this coin. Alex Borkowski/Mic.
Super Mario Run 4-3 walkthrough: "Danger High and Low"
Your gut reaction when you start this level might be to say, "Oh, it's 'Shell Me the Way,' just in a cave." You'd mostly be right. However, it's a little more dangerous than its predecessor because this level is rife with enemies and obstacles.
Much like the Koopa Troopas before them, Mario can clamber over Buzzy Beetles (which are still turtles, despite the name) and launch their shells at enemies. However, the Buzzy Beetles will sometimes drop down from the ceiling and launch themselves at him. Additionally, the Munchers from 3-1 are no longer relegated to the end of the level. You'll be avoiding them the entire time you're navigating through "Danger High and Low."
 Although they look somewhat more menacing than their Koopa counterparts (Kooperparts?) the Buzzy Beetles in this level are easily launched at unsuspecting enemies like the Piranha Plants. Just don't expect them to do any damage to the still-invulnerable Munchers. Alex Borkowski/Mic
The yellow exclamation switches you find throughout the level will, on the whole, make your journey through this cave much easier. Whether it's providing a path for your Buzzy Beetle shell to hit more enemies or a way forward for Mario himself, it usually pays to hit those switches when they show up. There is one switch where this is decidedly not the case, however, and it comes in the final stretch of the level. Hitting this switch will cause a number of Buzzy Beetles to drop down from the ceiling, some of whom will rocket towards you in their shells and make your life extremely difficult.
 Although hitting the exclamation switches in the past has always helped you out, the red blocks above you on this one hide a dark secret: tons of Buzzy Beetles. Alex Borkowski/Mic
And if all that wasn't already enough, once you're out of the cave itself, the final stretch of the level is covered in Munchers! Unlike the previous two cave levels in Super Mario Run, there's actually a chance you could die at the very end of this level. So make sure you're being careful with your jumps or else you risk having to do it all over again.
 These jumps aren't particularly tricky, but the fact that those Munchers are waiting down there to get a Mario-shaped snack is enough to give anyone pause. Alex Borkowski/Mic.
Super Mario Run 4-3 pink coin locations
The first pink coin of 4-3 is at the end of the first section. You'll simply have to jump above the pipe that takes you to the next area of the level and wall-kick off it to get to the narrow platform where the coin is. It's set up in a similar way to the first pink coin of 1-2 but requires a little more precise timing.
 As long as you avoid the pipe, wall-kicking up to this coin should be relatively simple, but it's a little easier to get through the gap if you're *not* Super Mario. Alex Borkowski/Mic
The second coin comes soon after in the second section. Avoid the Buzzy Beetles that drop down to attack you and leap over the Piranha Plant that comes out of the pipe. If you time it right, you'll launch over the plant and onto a small platform where you should see the pink coin hanging out in a group of regular ones.
 The Piranh Plant helpfully indicates that you should jump up onto this platform to grab the second pink coin of the level. Alex Borkowski/Mic
The third pink coin is on top of the second breakable platform in the following section. It's not a hard jump to make and you'll likely see the coin before you have to make the leap, so you have plenty of time to course correct and grab it.
 After the last couple of levels, surely no one is complaining about a few easy coins, right? Alex Borkowski/Mic
The fourth coin requires you to jump onto a solitary block and then from that block to another platform where the coin is. As long as you get within spitting distance of the first block, Mario should automatically climb onto it. If you do miss the initial jump, you can use the backflip blocks to get another attempt.
 The easiest way to get this coin is to hop onto the solitary block when coming from the left, but if you muff that jump you can give it another try with the blue backflip blocks, which might allow you to land on the block itself and look really cool. Alex Borkowski/Mic
The final coin is at the end of the first red block section in the final underground section of the level (the part with the exclamation switch we warned you not to hit earlier). At the end of that section is a Piranha Plant. If you can manage to jump off the pipe it comes out of at the right time, you'll land on a small platform with a yellow exclamation switch on it: vault over that switch to grab the coin.
 It would take some seriously fast footwork to get up to that platform once you've fallen off the pipe, but not all the coins in this level can be easy to get! Alex Borkowski/Mic.
Super Mario Run 4-4 walkthrough: "Firing the Airship's Burners"
Ready or not, it's time for another airship level. Let's not keep our favorite Koopaling waiting.
If you hated the cannons from 2-4, you're in luck! They're gone. Unfortunately, they've been replaced with burners that shoot giant jets of flame out of them with only about a second of warning. You're either going to have to be a pro jumper or take advantage of the level geometry in order to catch your breath.
 Firing that many burners at once has to be an enormous money pit for Bowser, to say nothing of the damage it's probably doing to the Mushroom Kingdom's ozone layer. Alex Borkowski/Mic
Thankfully, very few of the burners are difficult to avoid if you're just trying to get through the level. You can usually jump over them even when they're firing. There are a few exceptions, but until you get the layout down you should always use the pause blocks to check out what's happening up ahead before moving forward.
 It should go without saying in a game where you're forced to move laterally at all times that when the game gives you the chance for a breather, you should take it. Alex Borkowski/Mic
Again, as you approach Boom Boom's boss room, the game gives you a final chance for a Super Mushroom in case you're still not sure you can take him without getting hit. Just don't jump too high while trying to grab it or you'll get burned by the sets of downward-facing burners that have been installed on this part of the airship.
 There is absolutely no way these jets are providing any sort of downward thrust as it is. Alex Borkowski/Mic
As for the boss battle, Boom Boom the Koopaling is basically unchanged from his appearance in 2-4: you hop on his head three times and wall-kick off the walls of the arena to change direction. The only thing that's different now is the burners positioned on either side of the room, which fire intermittently. You shouldn't really even notice them if you're making sure to jump high and jump often while fighting Boom Boom, but it's still another nuisance.
 Even with the added danger of the burners, Boom Boom still goes down pretty easily. Alex Borkowski/Mic.
Super Mario Run 4-4 pink coin locations
Unfortunately, ignoring the nooks and crannies that the burners are often stuffed in is not going to be an option if you want all the pink coins in this level.
The first pink coin is on a strip of burners shooting skyward near the beginning of the level. The timing is definitely tight, but it's not hard to get to. You can also wait on a well-placed diagonal pause block until the flames die off and then make a run for it.
 Just make sure you don't overshoot the coin while jumping off that pause block and you should be fine. Alex Borkowski/Mic
The second coin is in another burner trap, but this time they're shooting to the right. If you don't feel confident about your ability to get down there and back out with the coin before the burners turn back on, you can wait against the side of a pipe to the left of the coin while the burners are firing and time your approach.
 The burners take a second to fire up, but if you try to grab the coin while they're doing this animation, you won't make it out in time to avoid getting hit. Alex Borkowski/Mic
The third coin is a little bit of a crapshoot. It's on top of a box that sits between two sets of burners that fire alternatively up or down. If you get lucky, the bottom burners will be firing while you cross and you'll be able to collect the coin without getting singed. If not, then you'll either have to take the hit or ignore it this time around.
 If you need the coins, you could jump up and grab it right now, but chances are you're still going to get hit by the burner when it activates. Alex Borkowski/Mic
The fourth coin is guarded by yet another jet trap, but you're likely to miss it if you're on a roll. Once you're done with the blue P switch and the coins it spawns, try to stick as low to the ground as you can. You should see the fourth pink coin in the path of a small burner. If you're not jumping, you can wait it out against a pipe, but if you're flying high you'll probably end up grabbing onto the burner on the other side, causing you to miss the coin and get hurt in the process.
 Although it's tempting to launch off all the Ninjis, there's a good chance you'll end up hanging off the burner if you do, missing your chance for the pink coin. Alex Borkowski/Mic
The fifth coin comes right after the fourth. Jump off a Ninji and hit one of the translucent coin blocks that it'll allow you to get to. The coins will point a path down and to the right that you can use to put yourself on a collision course with the final pink coin of the level.
 After playing with fire for the last four coins, it's nice to have one that just requires you to fall out of the sky to grab. Alex Borkowski/Mic
And if you've followed our guides up to this point, you should now have 80/120 pink coins in the entire game! Only 40 more to go to unlock a secret level!
Walkthrough Super Mario Run World 5
What you'll find in this guide:
• Super Mario Run 5-1 walkthrough
• Super Mario Run 5-1 pink coin locations
• Super Mario Run 5-2 walkthrough
• Super Mario Run 5-2 pink coin locations
• Super Mario Run 5-3 walkthrough
• Super Mario Run 5-3 pink coin locations
• Super Mario Run 5-4 walkthrough
• Super Mario Run 5-4 pink coin locations
• Super Mario Run tips and tricks
We've made it! We're now at the second-to-last world of Super Mario Run — and that much closer to rescuing Princess Peach from Bowser. Previously, we've climbed to the top of a tower full of buzzsaws and avoided getting burned by some strangely placed exhaust jets in World 4, navigated some more painful fire-based interior decorating in World 3, dodged Bullet Bills and falling platforms in World 2, and started our adventure with a leisurely stroll through a cave and some tall mushrooms in World 1.
Although World 5 will only offer variations on level designs we've seen previously (albeit with their own unique mechanics), we'll be meeting a formerly friendly face, getting the keys to locked doors and avoiding traps of both the "fire" and "spike" variety.

If you're confused about where the guides for the first four worlds are, they're right here! Take a peek at World 1, World 2, World 3 and World 4 first? The GIFs will wait, we promise. Without further ado, let's launch into level 5-1: "Lakitu's Revenge."
Super Mario Run 5-1 walkthrough: "Lakitu's Revenge"
Lakitu, the friendly Koopa from "Big Spiny Blitz" in World 3, has apparently decided he hates you now. Instead of throwing coins at you from the top of the level, now he throws Spinies (smaller than the ones you fought in 3-1, thankfully), making traversing this level quite difficult.
Thankfully, almost every question block in this level contains a Super Star, and with good timing and a little bit of luck you can spend most of your time in this level invincible! This is great, because you'll need to be in order to defeat the Spinies Lakitu throws at you and the Fuzzies rotating around at various parts of the level.
 Jumping from platform to platform while trying to grab those bouncing stars isn't always the easiest. However, missing one of those Super Stars due to a clumsy jump can cost you dearly, especially at this bounce pad where Lakitu loves to drop a Spiny directly onto Mario's noggin.

Nothing will kill your flow in this level quite like being stopped by a spike-shelled turtle being dropped onto your head, so don't let that happen! Collect as many Super Stars as possible.
By the time you reach the end of the level, you'll find two bounce pads that will launch you up to the top of the flagpole for your well-earned reward. Snag a Super Star and pulverize that Lakitu on your way up.

Normally you should never hit someone with glasses, but given that Lakitu has spent this whole level throwing sharp objects at you, we'd say it's justified in this case. Just don't make a habit out of it.
Super Mario Run 5-1 pink coin locations
The first pink coin of "Lakitu's Revenge" comes right after the question block that spawns the first star. It's an easy grab while you're chasing after the star — but make sure you actually get the star, because the Lakitu loves to throw a Spiny right into your path.
 It's not hard to grab the coin while pursuing the star as well, but the Spiny headed straight for you can make the timing a little tighter than you'd probably prefer.
The second pink coin is off the edge of a mushroom platform where you can find another Super Star. Even without the Super Star's coin magnetism active (though you really shouldn't be doing this level while not invincible), you should be able to just roll down the side of the yellow mushroom platform to the coin.
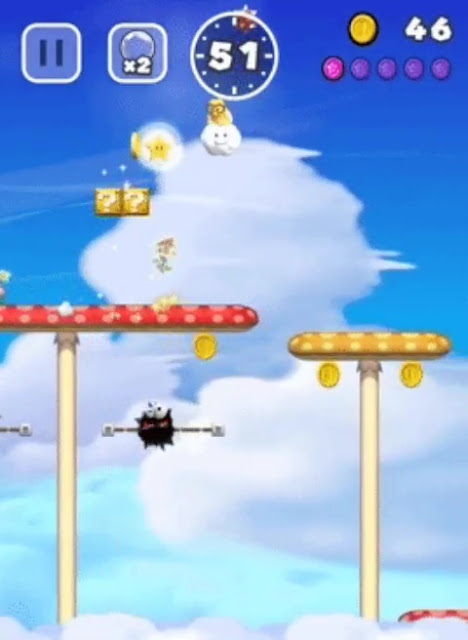 Jumping for the Super Star that spawns as well could mess up your timing for the coin, but it's worth it to extend your invincibility.
The third coin is near the bottom of a section where you ride around those yellow platforms from 2-2. These ones also disappear when you jump off them, so make sure you'll make it to the next one before jumping off the one you're on. By making your way to the lower portion of this section, you should see the third coin in a small arch in between two platforms. Just watch out for the Fuzzy and the Spiny nearby!
 If you get unlucky and Lakitu throws a Spiny on the platform to the left of the coin while you're not invincible, it'll take quick thinking to avoid him in the air and not get hit.
The fourth coin is at the top of the bounce pad that Lakitu loves to throw a Spiny onto. Much like the rest of the level, your safest bet is to be invincible when you attempt to grab it.
 You can see the flash of the pink coin at the top of Mario's jump here: With good timing, you could probably avoid the Spiny and grab it without a Super Star, but why take the chance?
The final coin is at the top of a mushroom platform near the end of the level. Watch out for the Spiny at the bottom if you're not invincible, but otherwise enjoy your flight!
 The fifth coin of the level is a pretty easy grab as long as you're paying attention to where Mario's going. It's tough when he's under the effects of the Super Star because he's so shiny!
Super Mario Run 5-2 walkthrough: "Pokey Vaulting"
Hard to believe it's been two worlds since our last desert level, and since we just had an entire level dealing with Spinies, you'll probably be pleased to know that the giant Spinies from 3-1 are absent from "Pokey Vaulting." They've been replaced with a friendlier-looking (but no less dangerous!) enemy: Pokey.
Pokeys tend to just sit in your path with a big dopey grin on their face. They're more obstacle than enemy, but you can knock them off things for some extra coins if you really need them.
 Even as their bodies break apart, the Pokey continues to grin as it falls into the sand. Deeply troubling.
Pokeys can also give you a ton of coins if you can manage to destroy them, but watch out! These long ones love to hang out on those yellow platforms and can easily spike you while you're distracted by the coins they've dropped.
 Chances are by this point you'll already have all the coins you could possibly need, so it's really not worth it to go scrambling for every coin the enemies drop.
The end of the level is probably the trickiest part: You have to time your use of a bounce pad to get over a positively massive Pokey, and then thread the needle through two Paratroopas using a cannon. If you can pull it off, you'll get 10 coins for hitting the top of the flagpole and bonus coins when the Paratroopas disappear.
 It's easy to get impatient waiting for the Pokey to move, but you'll regret it if you don't. Use Mario's twirl to get a little more lateral movement if you're in danger of getting skewered this close to the end of the stage.
Super Mario Run 5-2 pink coin locations
The first pink coin of "Pokey Vaulting" comes at the end of a small line of Pokeys near the beginning of the stage. Just make sure you're precise in your jump over the last Pokey and you'll clear it and grab the coin with room to spare.
 Sometimes Mario can just catch the side of the Pokey's top spikes and not get affected by them, but it's unclear whether this is intentional, a glitch or just an errant piece of animation.
The second pink coin in the level requires you to be patient. Jump between the two Paratroopas using the diagonal pause block provided and then wait until the Pokey dips almost all the way down before rolling off the pause block to grab the coin.
 The trick is to wait until the last second before the Pokey reaches the bottom of his ride so that you'll grab the coin by the time he's at the bottom and will clear him before he starts coming back up.
For the third pink coin, it's time to take a ride in a cannon. It's at the top of the line of coins floating over the Pokey, and requires you to aim a little higher than you think you need to in order to snag it without colliding with the Pokey below.
 Because Mario sinks a little bit as he flies through the air, it's best to aim a little higher than you think you ought to in order to not risk hitting the Pokey below.
For the fourth coin, you need to navigate some of those yellow platforms both 5-1 and World 3 were so fond of in order to jump over some joyriding Pokeys and grab the pink coin. It's hiding on a wooden block directly above the last Pokey in this area.
 Thankfully, the Pokey below you can't actually reach high enough to get you as long as you manage to grab onto the ledge the coin is resting on. If you miss though, you and the Pokey below will get to know each other really well.
The final coin will try to trick you into taking the high road, so make sure you're economical with your jumps. If you jump too high, you'll be stuck on that top platform and won't be able to get back down in order to grab the pink coin, which sits in the middle path.
 Getting onto the lower path here can be really tricky because there's a Pokey smack dab in the middle, so it might be the path of least resistance to just run through him if you're Super Mario. Inelegant, sure, but really easy.
Super Mario Run 5-3 walkthrough: "Boohind Lock and Key"
Remember how much fun we had trying to guess which door to go through for three screens straight in "Ghost-Door Deception" while simultaneously avoiding invincible Boos who always seemed to park directly in the path of your jumps? ... Yeah, we don't either. Thankfully, "Boohind Lock and Key" (along with being one of the worst Boo puns outside of the Boos from Luigi's Mansion) performs a small miracle in allowing you to stomp Boos. The downside: It's really hard to do consistently, and the mechanic for this level is somehow more complicated than 2-1's.
Case in point: You'll have to grab a key in each area to unlock the door and progress. It's not too hard to do in this first area where the key is on an elevated platform you can easily get to with the backflip blocks, but it's going to get a lot harder by the time we make our escape.
 This first key isn't hard to grab, but watch out for that Boo on the left who has a terrible habit of floating just far enough up to hit you through the blocks.
In the second area, the key is hidden in a brick block at the top of the level. Once you know where it is, you can come at it from the lefthand side of the stage, trigger it and then use the backflip blocks to get it in one fell swoop. If you hit the wrong block though, you're going to be stuck taking a few laps to grab it.
 As you can see as well, backflipping off a Boo can kill the malicious spirit, but it seems to be more luck than anything else, so good luck making it happen on command.
In the final area, a Boo holds the key to progress inside of it. You'll have to backflip off the blocks provided and hit it precisely in order to grab the key and get out of the level — but the hit detection on this leaves a little bit to be desired, so more often than not you'll be the one who ends up getting hit.
 It looks really cool to pull off, but trying to kill the Boos with backflips consistently is eminently frustrating, and can make what's already a tough level feel that much more difficult.
Super Mario Run 5-3 pink coin locations
To get the first pink coin, be prepared to backflip off one of the Boos in the first area. It's probably going to be a lot of trial and error, but as long as you pull it close to you by utilizing the platform the key was on, you can probably grab it pretty easily.
 Unless you're looking really closely inside the Boos for this one, you're probably going to discover this first coin purely by chance.
Grabbing the second and third pink coins should be familiar to anyone who got them in "Ghost-Door Deception." Use the bounce pad to get to the platform just under the door to grab No. 2, and then use the wraparound mechanic to end up on the other side of the stage where the bounce pad will take you to coin No. 3.
 These coins are actually easier to get than their counterparts in 2-1, since you can do them in one loop. That is, unless you jump too late on the left bounce pad, since Mario's momentum might cause him to miss the third coin.
The fourth pink coin is pretty much a gimme: Since it's right above the backflip pads, you'll need to use in order to grab both the key to exit the stage and the fifth coin.
 Even if the key is tricky to get, this coin is pretty much in the bag, since you'll need to use those blocks to progress anyway.
The final coin is another "backflip-and-kill-the-Boo" one, but it's made much trickier by the Stretch that loves to hang out on the backflip blocks. If you're really unlucky, you'll fall into a sequence where Stretch pops up right as you cross the platforms, making you unable to backflip onto the Boo that holds the fifth coin.
 If you need to take a minute to celebrate after getting this coin, do it. Just make sure you've paused your game or finished the level first!.
Super Mario Run 5-4 walkthrough: "Rings of Fire!"
Now t's a huge relief to go back to a traditional, scrolling Super Mario Run level, even if it is another trap-filled castle with an enormous angry Koopa at the end of it.
Structurally, "Rings of Fire" contains a lot of the same beats that previous castles in 3-4 and 1-4 did: There are a lot of lava-filled pits to fall into and eternally reviving Dry Bones to contend with (though the latter doesn't really matter because chances are you'll just scroll past them). However, "Rings of Fire" introduces a trap to replace the fireballs of "Bowser's Castle Hangout" and the Fire Bars of "Fire Bar Castle! Youch!" with moving hoops of fire Mario has to jump through.
 Enjoy the stationary rings while you can, because they won't stay that way until the end of the level.
About halfway through the level, you'll find a Red Coin Ring that you can use to get a Super Star, but three of the coins require you to hop off a Dry Bones and through a fire ring, so it's not without risk.
 Additionally, hitting the first Dry Bones at the wrong moment can cause you to sail right over that second coin, which is at the very least incredibly frustrating.
Just before you fight King Koopa, the level is nice enough to give you a Super Mushroom in a mobile fire ring, and the timing is pretty lax, so it's a good thing to grab before facing off with Bowser.

The fire rings are quite easy to navigate because of the added horizontal movement of Mario's mid-air twirl, which you should definitely take advantage of.
The Bowser fight is unchanged from its incarnation in 1-4 and 3-4, except that now Bowser has installed a fire ring to protect himself. If you don't feel confident in your ability to dodge through the ring and jump over Bowser, you can always run straight through him if you're Super Mario, but the timing here is much less precise than it was in Fire Bar Castle.
 It's actually kind of tragic that Bowser continually invests in more complex and byzantine deterrents to keep Mario away from him when all he really needs to do is not be so careless about where he leaves his ax.
Super Mario Run 5-4 pink coin locations
The first pink coin of 5-4 is in the center of a ring of fire. Just wait until the coins line up in a rough arc and jump through in order to grab it.
 Timing your jumps with the moving fire rings can be really tricky, but 'Super Mario Run' usually gives you a pause block beforehand so you can line it up.
The second coin requires you to get up to an upper ledge by bouncing off a Dry Bones, then timing your leap through three rings of fire. Your best bet is to wait until the ring with the pink coin in it is coming up, but it's still a really tough needle to thread.
 Alternatively, you can just do what we've done here and launch poor Mario through a bunch of fiery rings. This isn't recommended though, as we fell into a lava pit directly below after collecting the coin but... any port in a storm when it comes to getting those coins!.
Show that Dry Bones who's boss in order to get the height necessary to grab the third pink coin, which is in a stationary fire ring just after the Red Coin Ring.

If you're going to be taking out your frustration about missing the red coins on a Dry Bones anyway, you might as well channel it toward something productive, like getting the third pink coin.
To get the fourth pink coin in "Rings of Fire," climb up to the top level of these tiered platforms and jump so Mario arcs down to avoid the fire ring while you do so. As always, it's best to use his twirl to make sure you clear it, but be careful about accidentally wall-kicking off the far wall as you go.

You won't be able to jump precisely from the middle platform, so make sure you go all the way up if you want to collect this coin.
The final coin is designed to give you a little bit of a breather as you approach Bowser. Just make sure you jump high enough to grab it from its ring and you'll be fine.
 The coin comes at the end of a gauntlet of flame hoops to jump through, so you should recognize the pattern by the time you get to this final coin.
And just like that, all the pink coins for World 5 are in the bag!.
Walkthrough Super Mario Run World 4
What you'll find in this guide:
• Super Mario Run 4-1 walkthrough
• Super Mario Run 4-1 pink coin locations
• Super Mario Run 4-2 walkthrough
• Super Mario Run 4-2 pink coin locations
• Super Mario Run 4-3 walkthrough
• Super Mario Run 4-3 pink coin locations
• Super Mario Run 4-4 walkthrough
• Super Mario Run 4-4 pink coin locations
• Super Mario Run tips and tricks
Now that we're in World 4 of Super Mario Run, we've officially reached the back half of Nintendo's new mobile game, which has only been live on iOS for about a week.
By way of a quick recap: Previously, in World 3, we took a break from dodging over Spinies in the desert to goof off in the clouds (and dodge Bullet Bills). Prior to that, we spent time in a haunted house and a cave in World 2, and we started our run in World 1, which was a variation on the first world of the original Super Mario Bros. for the NES.
World 4 will introduce a novel new level design for us (with the last truly new assets of the game), another level with a contrivance and our third cave level. It finishes with another Airship to bust up.
If you're new to the game, why not start with our guides for World 1, World 2 and World 3? Then you can read below for tips on World 4. Without any further delay, let's launch right in!
Super Mario Run 4-1 walkthrough: "Cutting-Edge Spire"
From the moment you start level 4-1, you'll notice that it's... tall. We've seen vertical portions previously in the second room of 2-1, "Ghost-Door Deception," but "Cutting-Edge Spire" is unique in that it's almost entirely vertical, save for a small bit at the end of the level.

Getting Mario to reverse his direction will require you to take a page from your fight with Boom Boom on the airship back in 2-4: When Mario wall-kicks off a wall, the direction he runs will reverse, allowing you to traverse the level and grab the pink coins. This is pretty easy for the first half of the level where all you're contending with are some Dry Bones (the skeletal Koopas you've seen in Bowser's Castle Hangout back in 1-4) and some platforming that'll only cost you time if you flub it. It becomes decidedly trickier when you reach the second half of the level, which introduces gauntlets of mobile and immobile buzzsaws (because why not).

Once the buzzsaws are introduced, you'll have to be more careful in your timing when it comes to climbing the spire. You can stall out some of the moving buzzsaws by not wall-kicking off the walls when Mario reaches them, and this will be necessary for some of the pink coins.
To offset a lot of this, you get 99 seconds (as opposed to the 90 you get in other levels), and "Cutting-Edge Spire" gives you not one but two timer blocks (first seen in "Sky-High Lifts and Leaps") for an additional 20 seconds.

Super Mario Run 4-1 pink coin locations
Getting all the coins in "Cutting-Edge Spire" will take some practice. The level has ways of denying you the ability to try multiple times for each coin, which comes as a surprise since it's one of the few levels that isn't scrolling horizontally.
The first coin is hidden behind a series of brick blocks, but by hitting the blue P switch to the right of them, you'll turn those blocks into coins. This one is hard to miss because chances are you'll already be running toward the switch when you get up to the platform it's on, and it's easy to vault off it and activate it.

The second coin utilizes the P switch as well, but for the opposite purpose. A little farther up the level, you'll see three brick blocks on the right side of the stage, and a bunch of coins in a conspicuously platform-like formation — don't grab them yet! If you hit the block farthest to the right, it'll create another blue P switch. Activate it, and those coins will turn into bricks, allowing you to cross them and grab the second pink coin, which is sitting on top of a yellow pipe.

Getting the third coin requires you to do some artful buzzsaw dodging in the latter half of the level. There's a platform below these two buzzsaws that'll allow you to nail the timing down. What you want to do is get a big enough gap to where the lower buzzsaw is to the left of you and the higher one is to the right. That'll allow you to pass through both and grab the coin. The upper buzzsaw is much faster than the lower one, though, so don't take too long!.

The fourth coin rests in a small covered alcove in a group of coins, which would normally be cause for celebration. However that alcove is surrounded by two rotating buzzsaws, so you not only need to avoid them as you're getting inside but also after grabbing the coin and leaping out. If you hop onto the side of the alcove where the coin is and jump near the very bottom, you can collect the coin and give yourself a few seconds to time your escape.

Finally, the fifth coin is perched atop the door leading out of the Spire in the shape of a clock. Simply avoid the the door and wall-kick up to the perch where the coin is. It's a well-earned break after the last four coins.

Super Mario Run 4-2 walkthrough: "Slope to Success"
Remember way back in 1-2 when you had the opportunity to slide down a long hill and knock out a bunch of Goombas, but you had to cut it short if you wanted to collect the third pink coin in that level? Well, the designers of Super Mario Run sure did, so 4-2 is an entire level dedicated to letting Mario slide down hills and knock unsuspecting enemies out of the way.
The early portion of level tasks you with sliding down long hills and knocking enemies out of the way, taking in the scenery and the music (if you haven't gotten tired of it already).

Until about two-thirds of the way through the level, your main task is sliding when you're able to. You'll also occasionally need to find your way back to the level using wall-kicks or bounce pads, though the latter will only work if you have a mushroom because of the blocks positioned above them. Eventually, though, you'll reach a small blue and yellow cannon that you can (and should) hop into. Once you do, it'll spawn a bunch of blue coins that you can launch yourself through to get some extra cash.

If you're going to die in 4-2, it's definitely going to be at the end when you have to leap from one floating slide platform to another. For whatever reason, the game sometimes has trouble registering your jumps, causing Mario to confidently fly off the side of the stage to his untimely demise. It's sort of funny and weird to see happening in real time, but it can still be frustrating if it costs you a good run.

Super Mario Run 4-2 pink coin locations
Unlike 4-1, "Slope to Success" starts you off with an incredibly easy coin to get. It's over a pit after you finish your first initial slide, and all you have to do is hop over the pit to get it.

The second coin is trapped in a bunch of breakable blocks a little bit further into the level. You can use the bounce pad underneath to break them and get the coin, but only if you're Super Mario. So watch out for the Paratroopa who's floating around just before you get to this coin. It's reminiscent of how you grab the Super Star in "Shell Me the Way" except now not being Super Mario is denying you those sweet, sweet Rally tickets instead of just a power up.

To get the third coin, wall-kick up the path in between the two green pipes and the righthand wall to get to another hill you can slide down. Try to keep your momentum going to get onto another hill to the right of that. You should see the coin floating above the end of the platform. Jump high enough, and it's yours!.

You'll have to be ready for the fourth coin because it comes almost immediately after the third. Use the bounce pad as soon as you see it to launch yourself through a long line of blocks and into the pink coin, hidden at the top. Again, you'll need to be Super Mario for this to work. So watch out for enemies.

The final coin is right after the blue coin cannon. As you're sliding down the hill that comes directly after it, you should see the coin at the end of a short jump. The same rules apply from coin 3 here, so make sure you ramp it off that platform to grab the coin.

Super Mario Run 4-3 walkthrough: "Danger High and Low"
Your gut reaction when you start this level might be to say, "Oh, it's 'Shell Me the Way,' just in a cave." You'd mostly be right. However, it's a little more dangerous than its predecessor because this level is rife with enemies and obstacles.
Much like the Koopa Troopas before them, Mario can clamber over Buzzy Beetles (which are still turtles, despite the name) and launch their shells at enemies. However, the Buzzy Beetles will sometimes drop down from the ceiling and launch themselves at him. Additionally, the Munchers from 3-1 are no longer relegated to the end of the level. You'll be avoiding them the entire time you're navigating through "Danger High and Low."

The yellow exclamation switches you find throughout the level will, on the whole, make your journey through this cave much easier. Whether it's providing a path for your Buzzy Beetle shell to hit more enemies or a way forward for Mario himself, it usually pays to hit those switches when they show up. There is one switch where this is decidedly not the case, however, and it comes in the final stretch of the level. Hitting this switch will cause a number of Buzzy Beetles to drop down from the ceiling, some of whom will rocket towards you in their shells and make your life extremely difficult.

And if all that wasn't already enough, once you're out of the cave itself, the final stretch of the level is covered in Munchers! Unlike the previous two cave levels in Super Mario Run, there's actually a chance you could die at the very end of this level. So make sure you're being careful with your jumps or else you risk having to do it all over again.

Super Mario Run 4-3 pink coin locations
The first pink coin of 4-3 is at the end of the first section. You'll simply have to jump above the pipe that takes you to the next area of the level and wall-kick off it to get to the narrow platform where the coin is. It's set up in a similar way to the first pink coin of 1-2 but requires a little more precise timing.

The second coin comes soon after in the second section. Avoid the Buzzy Beetles that drop down to attack you and leap over the Piranha Plant that comes out of the pipe. If you time it right, you'll launch over the plant and onto a small platform where you should see the pink coin hanging out in a group of regular ones.

The third pink coin is on top of the second breakable platform in the following section. It's not a hard jump to make and you'll likely see the coin before you have to make the leap, so you have plenty of time to course correct and grab it.

The fourth coin requires you to jump onto a solitary block and then from that block to another platform where the coin is. As long as you get within spitting distance of the first block, Mario should automatically climb onto it. If you do miss the initial jump, you can use the backflip blocks to get another attempt.

The final coin is at the end of the first red block section in the final underground section of the level (the part with the exclamation switch we warned you not to hit earlier). At the end of that section is a Piranha Plant. If you can manage to jump off the pipe it comes out of at the right time, you'll land on a small platform with a yellow exclamation switch on it: vault over that switch to grab the coin.

Super Mario Run 4-4 walkthrough: "Firing the Airship's Burners"
Ready or not, it's time for another airship level. Let's not keep our favorite Koopaling waiting.
If you hated the cannons from 2-4, you're in luck! They're gone. Unfortunately, they've been replaced with burners that shoot giant jets of flame out of them with only about a second of warning. You're either going to have to be a pro jumper or take advantage of the level geometry in order to catch your breath.

Thankfully, very few of the burners are difficult to avoid if you're just trying to get through the level. You can usually jump over them even when they're firing. There are a few exceptions, but until you get the layout down you should always use the pause blocks to check out what's happening up ahead before moving forward.

Again, as you approach Boom Boom's boss room, the game gives you a final chance for a Super Mushroom in case you're still not sure you can take him without getting hit. Just don't jump too high while trying to grab it or you'll get burned by the sets of downward-facing burners that have been installed on this part of the airship.

As for the boss battle, Boom Boom the Koopaling is basically unchanged from his appearance in 2-4: you hop on his head three times and wall-kick off the walls of the arena to change direction. The only thing that's different now is the burners positioned on either side of the room, which fire intermittently. You shouldn't really even notice them if you're making sure to jump high and jump often while fighting Boom Boom, but it's still another nuisance.

Super Mario Run 4-4 pink coin locations
Unfortunately, ignoring the nooks and crannies that the burners are often stuffed in is not going to be an option if you want all the pink coins in this level.
The first pink coin is on a strip of burners shooting skyward near the beginning of the level. The timing is definitely tight, but it's not hard to get to. You can also wait on a well-placed diagonal pause block until the flames die off and then make a run for it.

The second coin is in another burner trap, but this time they're shooting to the right. If you don't feel confident about your ability to get down there and back out with the coin before the burners turn back on, you can wait against the side of a pipe to the left of the coin while the burners are firing and time your approach.

The third coin is a little bit of a crapshoot. It's on top of a box that sits between two sets of burners that fire alternatively up or down. If you get lucky, the bottom burners will be firing while you cross and you'll be able to collect the coin without getting singed. If not, then you'll either have to take the hit or ignore it this time around.

The fourth coin is guarded by yet another jet trap, but you're likely to miss it if you're on a roll. Once you're done with the blue P switch and the coins it spawns, try to stick as low to the ground as you can. You should see the fourth pink coin in the path of a small burner. If you're not jumping, you can wait it out against a pipe, but if you're flying high you'll probably end up grabbing onto the burner on the other side, causing you to miss the coin and get hurt in the process.

The fifth coin comes right after the fourth. Jump off a Ninji and hit one of the translucent coin blocks that it'll allow you to get to. The coins will point a path down and to the right that you can use to put yourself on a collision course with the final pink coin of the level.

And if you've followed our guides up to this point, you should now have 80/120 pink coins in the entire game! Only 40 more to go to unlock a secret level!
Walkthrough Super Mario Run World 5
What you'll find in this guide:
• Super Mario Run 5-1 walkthrough
• Super Mario Run 5-1 pink coin locations
• Super Mario Run 5-2 walkthrough
• Super Mario Run 5-2 pink coin locations
• Super Mario Run 5-3 walkthrough
• Super Mario Run 5-3 pink coin locations
• Super Mario Run 5-4 walkthrough
• Super Mario Run 5-4 pink coin locations
• Super Mario Run tips and tricks
We've made it! We're now at the second-to-last world of Super Mario Run — and that much closer to rescuing Princess Peach from Bowser. Previously, we've climbed to the top of a tower full of buzzsaws and avoided getting burned by some strangely placed exhaust jets in World 4, navigated some more painful fire-based interior decorating in World 3, dodged Bullet Bills and falling platforms in World 2, and started our adventure with a leisurely stroll through a cave and some tall mushrooms in World 1.
Although World 5 will only offer variations on level designs we've seen previously (albeit with their own unique mechanics), we'll be meeting a formerly friendly face, getting the keys to locked doors and avoiding traps of both the "fire" and "spike" variety.

If you're confused about where the guides for the first four worlds are, they're right here! Take a peek at World 1, World 2, World 3 and World 4 first? The GIFs will wait, we promise. Without further ado, let's launch into level 5-1: "Lakitu's Revenge."
Super Mario Run 5-1 walkthrough: "Lakitu's Revenge"
Lakitu, the friendly Koopa from "Big Spiny Blitz" in World 3, has apparently decided he hates you now. Instead of throwing coins at you from the top of the level, now he throws Spinies (smaller than the ones you fought in 3-1, thankfully), making traversing this level quite difficult.
Thankfully, almost every question block in this level contains a Super Star, and with good timing and a little bit of luck you can spend most of your time in this level invincible! This is great, because you'll need to be in order to defeat the Spinies Lakitu throws at you and the Fuzzies rotating around at various parts of the level.


Nothing will kill your flow in this level quite like being stopped by a spike-shelled turtle being dropped onto your head, so don't let that happen! Collect as many Super Stars as possible.
By the time you reach the end of the level, you'll find two bounce pads that will launch you up to the top of the flagpole for your well-earned reward. Snag a Super Star and pulverize that Lakitu on your way up.

Normally you should never hit someone with glasses, but given that Lakitu has spent this whole level throwing sharp objects at you, we'd say it's justified in this case. Just don't make a habit out of it.
Super Mario Run 5-1 pink coin locations
The first pink coin of "Lakitu's Revenge" comes right after the question block that spawns the first star. It's an easy grab while you're chasing after the star — but make sure you actually get the star, because the Lakitu loves to throw a Spiny right into your path.

The second pink coin is off the edge of a mushroom platform where you can find another Super Star. Even without the Super Star's coin magnetism active (though you really shouldn't be doing this level while not invincible), you should be able to just roll down the side of the yellow mushroom platform to the coin.

The third coin is near the bottom of a section where you ride around those yellow platforms from 2-2. These ones also disappear when you jump off them, so make sure you'll make it to the next one before jumping off the one you're on. By making your way to the lower portion of this section, you should see the third coin in a small arch in between two platforms. Just watch out for the Fuzzy and the Spiny nearby!

The fourth coin is at the top of the bounce pad that Lakitu loves to throw a Spiny onto. Much like the rest of the level, your safest bet is to be invincible when you attempt to grab it.

The final coin is at the top of a mushroom platform near the end of the level. Watch out for the Spiny at the bottom if you're not invincible, but otherwise enjoy your flight!

Super Mario Run 5-2 walkthrough: "Pokey Vaulting"
Hard to believe it's been two worlds since our last desert level, and since we just had an entire level dealing with Spinies, you'll probably be pleased to know that the giant Spinies from 3-1 are absent from "Pokey Vaulting." They've been replaced with a friendlier-looking (but no less dangerous!) enemy: Pokey.
Pokeys tend to just sit in your path with a big dopey grin on their face. They're more obstacle than enemy, but you can knock them off things for some extra coins if you really need them.

Pokeys can also give you a ton of coins if you can manage to destroy them, but watch out! These long ones love to hang out on those yellow platforms and can easily spike you while you're distracted by the coins they've dropped.

The end of the level is probably the trickiest part: You have to time your use of a bounce pad to get over a positively massive Pokey, and then thread the needle through two Paratroopas using a cannon. If you can pull it off, you'll get 10 coins for hitting the top of the flagpole and bonus coins when the Paratroopas disappear.

Super Mario Run 5-2 pink coin locations
The first pink coin of "Pokey Vaulting" comes at the end of a small line of Pokeys near the beginning of the stage. Just make sure you're precise in your jump over the last Pokey and you'll clear it and grab the coin with room to spare.

The second pink coin in the level requires you to be patient. Jump between the two Paratroopas using the diagonal pause block provided and then wait until the Pokey dips almost all the way down before rolling off the pause block to grab the coin.

For the third pink coin, it's time to take a ride in a cannon. It's at the top of the line of coins floating over the Pokey, and requires you to aim a little higher than you think you need to in order to snag it without colliding with the Pokey below.

For the fourth coin, you need to navigate some of those yellow platforms both 5-1 and World 3 were so fond of in order to jump over some joyriding Pokeys and grab the pink coin. It's hiding on a wooden block directly above the last Pokey in this area.

The final coin will try to trick you into taking the high road, so make sure you're economical with your jumps. If you jump too high, you'll be stuck on that top platform and won't be able to get back down in order to grab the pink coin, which sits in the middle path.

Super Mario Run 5-3 walkthrough: "Boohind Lock and Key"
Remember how much fun we had trying to guess which door to go through for three screens straight in "Ghost-Door Deception" while simultaneously avoiding invincible Boos who always seemed to park directly in the path of your jumps? ... Yeah, we don't either. Thankfully, "Boohind Lock and Key" (along with being one of the worst Boo puns outside of the Boos from Luigi's Mansion) performs a small miracle in allowing you to stomp Boos. The downside: It's really hard to do consistently, and the mechanic for this level is somehow more complicated than 2-1's.
Case in point: You'll have to grab a key in each area to unlock the door and progress. It's not too hard to do in this first area where the key is on an elevated platform you can easily get to with the backflip blocks, but it's going to get a lot harder by the time we make our escape.

In the second area, the key is hidden in a brick block at the top of the level. Once you know where it is, you can come at it from the lefthand side of the stage, trigger it and then use the backflip blocks to get it in one fell swoop. If you hit the wrong block though, you're going to be stuck taking a few laps to grab it.

In the final area, a Boo holds the key to progress inside of it. You'll have to backflip off the blocks provided and hit it precisely in order to grab the key and get out of the level — but the hit detection on this leaves a little bit to be desired, so more often than not you'll be the one who ends up getting hit.

Super Mario Run 5-3 pink coin locations
To get the first pink coin, be prepared to backflip off one of the Boos in the first area. It's probably going to be a lot of trial and error, but as long as you pull it close to you by utilizing the platform the key was on, you can probably grab it pretty easily.

Grabbing the second and third pink coins should be familiar to anyone who got them in "Ghost-Door Deception." Use the bounce pad to get to the platform just under the door to grab No. 2, and then use the wraparound mechanic to end up on the other side of the stage where the bounce pad will take you to coin No. 3.

The fourth pink coin is pretty much a gimme: Since it's right above the backflip pads, you'll need to use in order to grab both the key to exit the stage and the fifth coin.

The final coin is another "backflip-and-kill-the-Boo" one, but it's made much trickier by the Stretch that loves to hang out on the backflip blocks. If you're really unlucky, you'll fall into a sequence where Stretch pops up right as you cross the platforms, making you unable to backflip onto the Boo that holds the fifth coin.

Super Mario Run 5-4 walkthrough: "Rings of Fire!"
Now t's a huge relief to go back to a traditional, scrolling Super Mario Run level, even if it is another trap-filled castle with an enormous angry Koopa at the end of it.
Structurally, "Rings of Fire" contains a lot of the same beats that previous castles in 3-4 and 1-4 did: There are a lot of lava-filled pits to fall into and eternally reviving Dry Bones to contend with (though the latter doesn't really matter because chances are you'll just scroll past them). However, "Rings of Fire" introduces a trap to replace the fireballs of "Bowser's Castle Hangout" and the Fire Bars of "Fire Bar Castle! Youch!" with moving hoops of fire Mario has to jump through.

About halfway through the level, you'll find a Red Coin Ring that you can use to get a Super Star, but three of the coins require you to hop off a Dry Bones and through a fire ring, so it's not without risk.

Just before you fight King Koopa, the level is nice enough to give you a Super Mushroom in a mobile fire ring, and the timing is pretty lax, so it's a good thing to grab before facing off with Bowser.

The fire rings are quite easy to navigate because of the added horizontal movement of Mario's mid-air twirl, which you should definitely take advantage of.
The Bowser fight is unchanged from its incarnation in 1-4 and 3-4, except that now Bowser has installed a fire ring to protect himself. If you don't feel confident in your ability to dodge through the ring and jump over Bowser, you can always run straight through him if you're Super Mario, but the timing here is much less precise than it was in Fire Bar Castle.

Super Mario Run 5-4 pink coin locations
The first pink coin of 5-4 is in the center of a ring of fire. Just wait until the coins line up in a rough arc and jump through in order to grab it.

The second coin requires you to get up to an upper ledge by bouncing off a Dry Bones, then timing your leap through three rings of fire. Your best bet is to wait until the ring with the pink coin in it is coming up, but it's still a really tough needle to thread.

Show that Dry Bones who's boss in order to get the height necessary to grab the third pink coin, which is in a stationary fire ring just after the Red Coin Ring.

If you're going to be taking out your frustration about missing the red coins on a Dry Bones anyway, you might as well channel it toward something productive, like getting the third pink coin.
To get the fourth pink coin in "Rings of Fire," climb up to the top level of these tiered platforms and jump so Mario arcs down to avoid the fire ring while you do so. As always, it's best to use his twirl to make sure you clear it, but be careful about accidentally wall-kicking off the far wall as you go.

You won't be able to jump precisely from the middle platform, so make sure you go all the way up if you want to collect this coin.
The final coin is designed to give you a little bit of a breather as you approach Bowser. Just make sure you jump high enough to grab it from its ring and you'll be fine.

And just like that, all the pink coins for World 5 are in the bag!.


No comments:
Post a Comment